
2024-25
![]()
YEARBOOK PRO
USER GUIDE

CONTENTS
What’s New in Yearbook Pro for the 2024-25 Season? 5
The Yearbook Design Process 6
USING THIS GUIDE 6
Configuration and Preparation 6
Software and System Requirements 7
THE BASIC STEPS 7
Help Within the Software 8
USER LOGIN 9
THE NAVIGATION BAR 10
Navigation Shortcuts 12
PREVIEWING YOUR BOOK 13
Monitoring Book Progress 13
Student Coverage Reports 14
YEARBOOK CALENDAR 15
ACTIVITY LOG 18
SUPPORT CONTACT 19
INFO BOX 19
MESSAGE BOX 20
Organizing Your Yearbook Using the Yearbook Ladder 21
Working in the Section View 31
Using the Advanced Design Page 33
Using the Main Toolbar 36
ADDING STYLES 38
Adding Templates and Backgrounds 39
Working with Candid Photos 41
Working with Portrait Photos 43
Adding Art to Your Pages 54
Working with My Templates 57
EDITING PHOTOS 58
Adding and Editing Text 64
Selecting and Editing Multiple Frames Together 66
ADDING PAGE NUMBERS 69
Adding Grad and Biz Ads 69
BUILDING AN INDEX 70
Face-Matching and Auto-Tagging of Photos 73
Organization of the Manage Photos Page 74
Working with Candid Photos on the Candids Tab 74
Working with Portraits on the Portraits Tab 80
Using Photo Post to Collect Photos 88
Importing Photos from Google Drive 90
Working with Art on the Art Tab 91
Understanding User Roles 93
ADDING USERS 94
Updating Users with User Settings 95
Viewing a Summary Sales Report 96
Viewing a Detailed Sales Report 96
Viewing a Detailed Sales Report 97
Managing Content on the Configure Page 99
The Basic Proofing and Acceptance Process 101
PROOFING OPTIONS 103
Proofing Status and Messaging 107
YOUR SUPPORT CONTACT 108
KNOWLEDGE BASE 108
TROUBLESHOOTING 108
INTRODUCTION
![]()
Welcome to UBuildABook Yearbook Pro!
UBuildABook's Yearbook Pro software combines the very latest web-based application technology with a wealth of collaboration features, creative tools, and professionally designed content. Our goal at UBuildABook is to make designing your yearbook fun, trouble-free, and exceptionally rewarding!
What’s New in Yearbook Pro for the 2024-25 Season?
If you’re a returning user, you’ll notice some awesome improvements for this season! Here’s an overview of the new features:
Yearbook Curriculum! This season you’ll have access to a complete Yearbook Curriculum, providing Advisers the tools to learn and the confidence to teach yearbook and journalism best practices, while using the UBuildABook software. The curriculum has multiple
modules, each
![]()
with a new topic, with videos, worksheets, handouts, posters and more! The Curriculum resides in the UBuildABook Knowledge Base, and is directly available via a link in the software.
made across
![]()
Pixami’s product family, and in all supporting documentation.
Feature and Name Changes. In support of our new school yearbook curriculum, new content, and the maturation of UBuildABook's software to participate in the High School space, we’ve made changes to some key features. These changes, below, have been
The Clip Art feature has been removed altogether.
Elements have been renamed Art.
Themes are now called Styles.
Layouts are now called Templates.
Saved Layouts are now called My Templates.
Content Updates! We’ve replaced the Clip Art and Elements tabs with a new Art tab containing 10,000+ newly curated art objects, organized into major categories with multiple levels of subcategories, and searchable by keyword. In addition to Art, there new Backgrounds, Templates, and professionally designed Styles, for EL, MS and HS.
Face Matching. Face matching will now be turned off until enabled by an Adviser. Once enabled, candid photos will be tagged with high performance, and can be reviewed in a
Caption and tag interface. UBuildABook's goal with this technology is to help manage fair student coverage; develop automatic, accurate indexes; and provide the tools for easy caption development.
Zoom Tools. The Layout Size feature on the Advanced Design page has been replaced with Zoom tools, allowing much greater flexibility for zooming in and out on the page.
Thanks to
![]()
everyone for the great input.
Lot’s More! UBuildABook spends each summer working hard in response to the previous season’s input! As a result there are numerous other minor bug fixes, features and tweaks.
Thank YOU for using UBuildABook! Have a great yearbook season!
1.2 The Yearbook Design Process
The basic process for creating your yearbook will involve defining the book using a planning ladder, and then designing individual sections using a robust set of page design tools.
You’ll be able to combine templates, photos, text, and art into custom-designed, finished pages, organized into sections. Multiple users can collaborate on the yearbook simultaneously, each working on their own sections.
Finished sections will be checked into an adviser for review. The adviser can then approve or reject each section, with online comments and interaction.
Once all sections of your yearbook have been created and approved, the yearbook will be ready for print! An Adviser will review and accept the final book, and send it off for printing!
1.3 Using this Guide
This User Guide describes the process for creating your yearbook using all the features in the software. Shortcut links to other relevant sections of the User Guide are shown as underlined. Clicking the underlined link will take you to that specific section.
![]()
Helpful Tips and Important things to note are emphasized in green text.
![]()
1.4 Configuration and Preparation
Before you start, your software should have been configured with a blank book, in the appropriate style and number of pages. If you have any questions about this configuration, please contact your yearbook provider.
Once this has been accomplished, you are ready to begin creating your yearbook. In preparation you should have a plan for the organization of the sections in your yearbook, and the expected number of pages per section. It is also helpful to have your candid photos organized for each section.
Finally, if multiple people will work together to create your book, such as in a Yearbook Class, you should have a list with the names, and e-mail addresses if appropriate, of each person that will be involved, along with an idea of their individual responsibility. This planning will help to ensure that the creation process goes smoothly.
Software and System Requirements
Please be sure that you are using a compatible computer/device and a supported browser to create your yearbook. Yearbook Pro is certified to run reliably on the following systems and browsers:
Operating System Device Browser
Apple Macintosh | Laptop computers Desktop computers | Apple Safari Mozilla Firefox Google Chrome |
Windows | Laptop computers Desktop computers | Mozilla Firefox Google Chrome Microsoft Edge |
Apple iOS | iPad tablet | Safari |
Android | Tablet computers | Google Chrome |
Chrome OS | Chromebook | Google Chrome |
New operating systems, browser versions and devices are constantly being made available, and we’re committed to providing compatibility with the most popular platforms. If you have any questions about a specific device or operating environment, please contact your yearbook representative.
![]()
Tip! For the best software performance, you should have a reliable high-speed Internet connection.
![]()
The Basic Steps
Below are the basic steps for creating your yearbook using the software. Each of these steps is described in detail in the User Guide. Click the link if you’d like to go directly to the section.
Add users to the software.
Add sections to your book, and assign sections to individual users (if applicable)
Upload and organize photos for use in your yearbook.
Edit the sections of your book.
Submit sections for review and approval.
Submit the final book for print!
Help Within the Software
In addition to the information in this User Guide, you can also get help at the top right of each page in the software.
![]()
Click the Video Help link to watch a video tutorial of the main features on each page.
Click Help for access to an online version of this User Guide, a complete Online Knowledge Base, Documentation and Tutorial Videos, and your Direct Support Contact information.
USING THE SOFTWARE
Let’s Get Started!
Your yearbook software has its own web site. You should have been given a link to your yearbook site by your adviser or administrator, along with a username and password. Each time you use the software you will go to this site and login on the home page.
User Login
On the home page of your site, you will see your school’s name, with a login section below it. To login, enter your username and password then click the Login button.
If you do not have login information, please contact your adviser or administrator.

Forgot Password
If you forgot your password, or your password isn’t working, click the Forgot Password link. You will be redirected to the Forgot Password page. Type in the e-mail address that you registered with, and then click Send. You will receive an email with instructions for changing your password.
Please contact your Yearbook Adviser or Support Contact if you have any issues logging into the software.
The Navigation Bar

The Navigation Bar is located at the left of each page after you login, and provides access to all the pages in the software.
Main features of the software are organized on six different pages, which will be available to you based on the permissions granted by your adviser or administrator.
These pages are, arranged from top to bottom on the Navigation Bar:
Home / Activity Page
Yearbook (Ladder) Page
Photos Page
Users Page
Sales Page
Adviser Configure Page
Depending on your permissions you may not see all these buttons. Each page is described below. The Users section of this document describes the permission levels.
The Activity Page
The Activity page is the main dashboard page that you see when you log into the software. The Activity page provides information about the book and overall progress.
The Yearbook Ladder Page
The Yearbook or Yearbook Ladder page allows you to set up and organize your yearbook using a planning ladder, arrange and modify individual sections, assign sections to different users, and check out sections for editing.
The Users Page
The Users page allows you to add users to the site and modify their permissions.
The Photos Page
The Photos page allows you to add and organize candid and portrait photos and art for your yearbook.
The Sales Page
The Sales page allows advisers to track sales of yearbooks, yearbook ads and other products sold online using the UBuildABook Storefront online e-commerce software. The Storefront is included and integrated with Yearbook Pro and is essential to maximizing your yearbook sales. Check with your Adviser or yearbook provider for more information.
The Adviser Configure Page
The Adviser Configure or Configure page allows advisers to manage the available content, as well as page numbers in the book.
Video Help
Click the Video Help link at the top of each page of the software for a video overview of the main features on each page.
![]()
Tip! We recommend that new users of the software watch the Video Help Tutorials at the top of each page. This is a great way to learn the software quickly!
![]()
Help
Click Help to view any current help or warning messages from the software. A message indicator will appear when there is a new help message.
Below any alert messages you will also see a link to this User Guide. Clicking the link will open the User Guide in a new browser tab, showing the section related to your current location in the software.
Logout
Click Logout to exit and log out of the software.
The following chapters describe all the features in the software, organized by page.
THE ACTIVITY PAGE
Each time you login to the site, you’ll see the Activity Page, which can also be referred to as the main dashboard of the software or the Home page. This page provides an overview of the yearbook and its progress and is your starting point for accessing the features in the software.
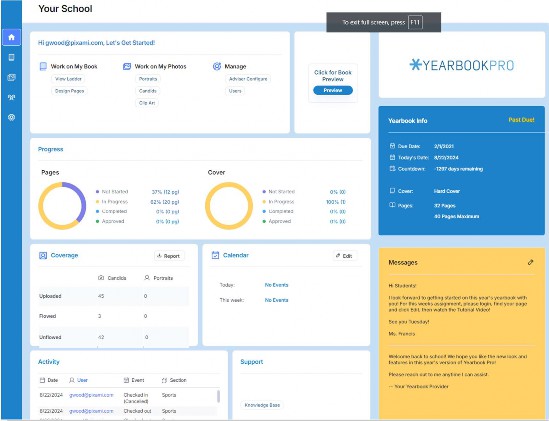
All the functionality on the Activity Page is organized into sections, or ‘boxes.’ Following is a description of the main sections on the Activity Page.
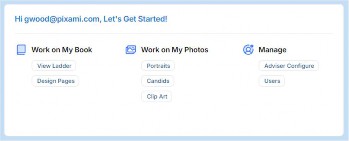
Navigation Shortcuts
The Let’s Get Started section, at the top left of the page, provides direct links to specific functions in the yearbook. You can use these links as shortcuts to navigate through the software based on what you need to do.
Previewing Your Book
Click the Book Preview to the right of the Let’s Get Started section to display a current preview of the book.

Monitoring Book Progress
The Progress Section, below the Preview, provides a real-time visual overview of yearbook progress for the Book Pages and for the Cover, with color-coded graphs.
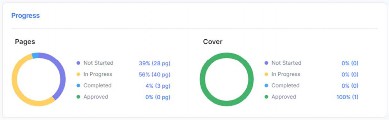
Not Started shows the percentage or number of pages that have not yet been started.
In Progress shows the percentage or number of pages that have been started and are in progress.
Completed shows the percentage or number of pages that have been marked complete by an editor.
Approved shows the percentage or number of pages that have been approved by an adviser.
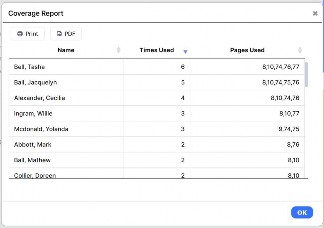
Student Coverage Reports
The Coverage section, just below the Progress section, shows the total number of Portraits and Candids that have been uploaded to the software, and the number of each that have been flowed into the book.
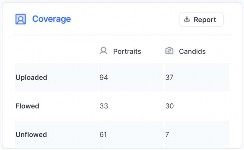
Click Report to view a detailed Student Coverage Report that lists each student, alongside the number of times they appear in the yearbook, and the specific page numbers they appear.
Information in the report can be sorted by clicking the column header. For example, you can sort from the student who appears the most in the book, to the least.
Click Print to print the Coverage Report. Click PDF to Save it as a PDF.
Why Is the Coverage Report Important?
First, a coverage report is only possible if all the images in the book, candids and portraits, are tagged with accurate student name data. This is a significant manual undertaking that has now
been automated. Face Matching Technology tags all candid images with student and staff names, automatically and with extremely high accuracy.
Now that you have an accurate Student Coverage Report available, you can use it to promote fairness, by representing all students more equally in the yearbook.
A well-rounded and inclusive yearbook that truly encapsulates the spirit of the school year will also increase the popularity of the yearbook!
Yearbook Calendar
The Yearbook Calendar feature allows yearbook Advisers and staff to keep track of important yearbook-related dates. These can include yearbook design deadlines, meetings, sales and marketing actions, and even school sports and academic events. In addition, Admins can create and manage dates related to sales, marketing and production.
This feature allows yearbook staff to effectively oversee all the important aspects of your yearbook project, streamlining the process, improving organization and communication, and maximizing sales.
Todays and This Week’s Events
The Calendar displays all the events for Today and This Week on the Activity Page.
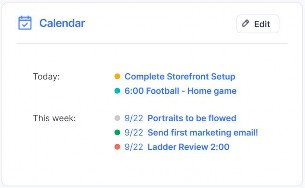
Events are color coded by type. Users with Adviser privileges can click Edit to Modify Evens and Add New Events to the Calendar.
Adding and Modifying Events for Advisers
Click Edit to open the Edit Calendar dialog and view the full calendar.
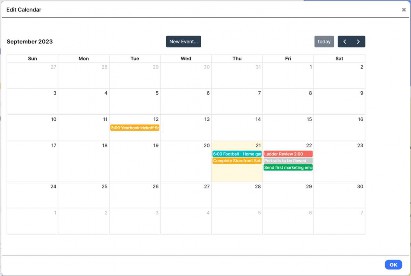
Click New Event to add a new event to the Calendar. The New Event dialog will appear.
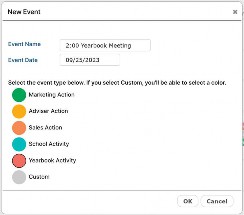
Type in the Name for your Event, and then select the Date for the Event. You can also type the Time into the Event Name field.
Next, choose a color-coded Event Type to help you organize your distinct types of events. Click OK to save the Event and add it to the calendar!
About Event Types
The software contains color-coded Event Types to help you organize the various activities related to your yearbook project. Below is a List of the main Event Types, along with examples of their use.
Marketing Action: includes reminders to Send Marketing E-mails, Hang Posters, Distribute Flyers, Make an Announcement, Make a Social Media post, Yearbook Signing Day, and other events to help market your yearbook.
Adviser Action: includes a variety of Adviser specific tasks, such as Quote Approvals, Ladder Reviews, Yearbook Meetings, Staff Meetings, Office Hours, and more.
Sales Action: these events serve as important reminders to implement key sales aspects of your plan, such as Launch Storefront, Launch Yearbook Pre-sales, Launch Ad sales, Run sales Report, Increase Presale Price, and other evens related to yearbook sales.
School Activity: includes Academic Events, Sports Events, Assemblies, and other important school events, especially those that are opportunities to get yearbook photo content or drive sales!
Yearbook Activity: includes specific major yearbook activities such as Flow Portraits, Ladder Review, Independent Section reviews, Yearbook Meeting, Homework Assignments and more.
Custom: Custom activities include anything else that you’d like to be reminded about in the yearbook software to help stay organized!
Editing Calendar Events
Double-click on an event in the calendar to edit the event. The Edit Event dialog will appear.
You can change the Event Name, Event Date or Event Type. Click OK to close the event and save your changes.
Check the box next to This event has been completed to complete the event. The Event will still show in the calendar, with strikethrough text.
Click Delete to delete the event. It will no longer appear in the calendar.
Due Dates and Automatic Dates
The following Due Dates are automatically placed into the calendar from their respective places in the software:
Book submission deadline
Cover submission deadline.
Section submission deadlines
Storefront Ad ordering deadline
Storefront Book ordering deadlines
Admin Events
Your yearbook administrator can also enter and manage events in the calendar, allowing for close coordination with their schools. Admins cannot edit or delete Adviser events. And Advisers cannot edit or delete Admin events.
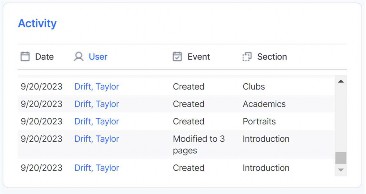
Activity Log
The Activity Log box, below the Coverage section, shows a real-time log of all user activity in the book. Items are arranged chronologically with the most recent at the top of the list, and the user and book section are shown for each event. You can scroll through the Activity log to see a complete history of the book.
Support Contact
The Support box is located at the base of the Activity page, and displays your direct support contact for assistance with the yearbook software. When you have questions about the software and need live assistance, use the phone and/or email information located here.
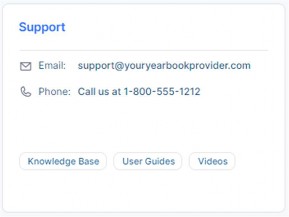
UBuildABook Knowledge Base
Below the Support Contact information, you may also see links for Knowledge Base, User Guides, Videos, and Yearbook Curriculum.
If enabled by your yearbook provider, these links provide access to a wealth of self-help information for the software, for users and advisers.
Info box
The Yearbook Info box, at the top right of the Activity Page, displays the Due Date for your yearbook, along with today’s date, and a countdown of days remaining. Below the due date information you will also see the book specification, including Cover Type, Number of Pages, and Quantity ordered. These items are configured by your yearbook provider.
If the due date has been passed and the book has not yet been submitted, a large Past Due
banner will appear in the Info box.
Once the book has been submitted, a large Book Submitted banner, along with the submission date and user information, will appear in the info box.
Message box
The Message box, at the lower right of the Activity Page, displays messages from your yearbook adviser and from your yearbook provider.
The text above the line is an editable message from Advisers.
Any user with Adviser privileges can add or update the adviser message by clicking the Edit
icon, and then typing in a new message.

The text below the line is controlled in Admin and allows your yearbook provider to post essential information about the project.
4 THE YEARBOOK PAGE
On the Yearbook, or Yearbook Ladder page, you can set up and organize your yearbook, arrange and modify individual sections, assign sections to different users, and check out sections for editing.
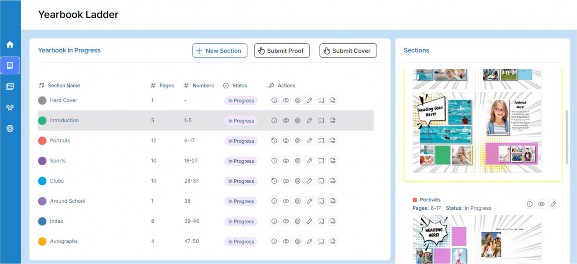
The Yearbook Planning Ladder, located on the left side of the Yearbook page, is a valuable tool that graphically illustrates all the pages of your yearbook, arranged into sections as they will appear in the finished book, with page numbers. The ladder helps you organize the book and determine the overall number of pages needed. In the case of a collaborative effort, the planning ladder can also be used to allow individual users to work on different sections of the book.
The Section View, located on the right side of the Yearbook page, displays a current thumbnail version of each section in the book, and provides shortcut access to key functionality.
![]()
Tip! Clicking on a section in the Yearbook Ladder will scroll that section into view in the Section View.
![]()
The Yearbook page is accessible by users with Adviser, Editor and Staff privileges. If you do not see the Yearbook button on the Navigation Bar, you have not been provided access.
4.1 Organizing Your Yearbook Using the Yearbook Ladder

It is helpful to plan and organize your yearbook ‘off-line’ before you get started with the software. You can then use the yearbook ladder to easily set up your yearbook.
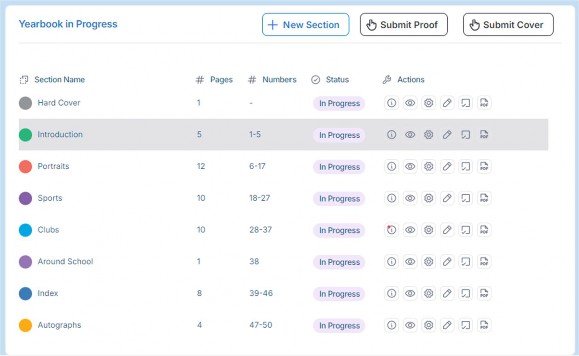
You can use the Yearbook Ladder to navigate through your book. Clicking on a colored section will highlight it in the Section Name column, and thumbnails for the section will scroll into view in the Section View.
Adding New Sections to Your Book
A book Section contains one or more pages, typically organized by subject matter. Typical yearbook sections include subjects like Student Life, Clubs, Sports, Academics, and Portraits.
Click the New Section button to add a new section to your yearbook. Then enter the Section Name, number of Pages for the section, choose a Color Code for the Yearbook Ladder, and choose a Style.
The Section Name will be referenced in the Section Name column and should represent the subject of the section. Note that you can also change the section name later at any time.
For Section Type, select Pages for all main sections of your book.
The Color Code will be used to identify the new section in the yearbook ladder. The software will select a new color automatically, or you can click on the color swatch and choose a different color from the color picker.
Enter the number of Pages for the section. You can add more pages to the section any time later.
Choose a Style for the section from the dropdown menu. Choose None if you would like to start with blank pages.
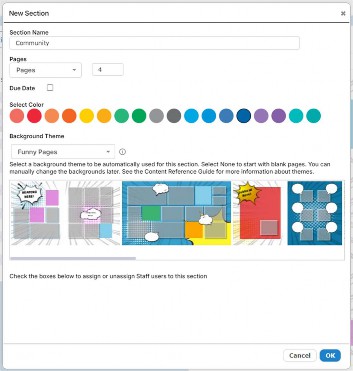
Selected Styles will be automatically applied to pages in your section, giving you a head start on the design. You can make any changes that you’d like later.
Refer to the Style Guide in the Knowledge Base for a detailed overview of all available Styles.
To add a Due Date for the section. Check the Due Date checkbox, and then enter the due date. Finally, check the appropriate boxes to assign the section to any Staff users, if applicable.
When you’re finished configuring your new section, click OK. The section will now appear in the Section Name list and on the yearbook ladder. Page numbers will be added automatically.
Repeat this process for each new section in your yearbook.
![]()
Tip! You can drag-and-drop the sections in the Section Name column to rearrange your yearbook. However, you will receive an alert if the change affects a section that is currently checked out by another user, or if it breaks spreads in another section.
![]()
Pages and Page Numbers
The Pages column shows the current number of pages in each section.
The Numbers column shows the current page number range for each section. The numbers will be updated as changes are made, such as adding pages to a section, or moving a section.
Understanding Section Status in the Status Column
On the Manage and Design Book page users can Check Out and work on individual sections of the book. Once they are finished with their page designs, they can Mark the Section Complete, which will submit it to an adviser for review. The adviser can then either Approve the section as finished, or Reject the section with a comment. Once all sections have been approved, the book is considered complete and can be ordered.
During this process, the status of each section may change. The Status column next to a section shows the status for that section and whether it’s available for editing by each user. There are four different section statuses: 1) In Progress, 2) Checked Out, 3) Complete and 4) Reviewed.
A status of In Progress means the section has been started but not completed. If you have Editor or Staff privileges and are assigned to this section, you will see a Check out for editing button. You can click on Check out for editing to check out this section and work on its design.
A status of Checked Out means the section is currently being edited by someone, and cannot be modified by anyone else. Only one person at a time can check out and work on a section.
However, multiple sections can be checked out by different users at the same time.
If you’re an Adviser, you can click Force Check-In to force the section to be checked in, if you know it is not currently being worked on. The section will be saved and then checked in, where it will then be available for editing.
A status of Complete means the section has been submitted and is waiting for an adviser to review it and provide feedback. To mark a section as complete, click the Mark Complete button. This will send an email to each Adviser letting them know that the section has been checked in.
Once you Check In a section, you will not be able to make any changes to the section until it has been Rejected by an Adviser and once again shows a status of In Progress.
A status of Reviewed means the section has been reviewed and approved by an adviser, and is ready to be printed when the other sections are complete. You will not be able to make any changes to the section unless it is Rejected by an adviser and once again shows a status of In Progress. See the Adviser Review section of this User Guide for more information.
Using the Actions Toolbar
The Actions Toolbar contains a set of features that allow you to arrange and modify individual sections, assign sections to different users, check out sections for editing, and submit sections for review and approval.
Features are accessed by clicking a toolbar icon, each of which are described below. Not all icons will be always available. The set of available icons will change depending on the status of the section, and your specific user privileges.
![]()
Info/Messaging
![]()
Click the Info/Messaging icon to view a complete history of the section.
You can also Add a Comment that will be available to anyone who can view the section. To add a comment, type your comment into the text field, then click the Comment button. A yellow alert icon will appear in the section name column to indicate that a new comment has been posted.
Preview
![]()
Click the Preview icon see an online preview of the selected section. You can turn the pages of the preview, and navigate through the entire yearbook.
Settings
![]()
Users with Editor or Adviser privileges can perform advanced section management functions using the menu items that can be accessed by clicking the Settings icon.
See the following section, Advanced Section Management, for more detail.
Edit
![]()
Click the Edit icon to check out a section of the yearbook and work on its design. You will be taken to the Advanced Design page.
While you are working on a section its status will be shown to other users as Checked Out, and no one else will be able to work on it.
Please see the Designing Your Yearbook section of this guide for more information about designing and editing your pages.
Force Check-in
![]()
Users with Adviser privileges can click the Force Check-in icon to gain access to a section that is currently checked out. This feature is intended to be used when the user forgot to properly check in the section after they were finished working. If a user is currently working on the section when this icon is clicked, they will lose access immediately.
Mark Complete
![]()
Click the Mark Complete icon when you are done editing a section and ready to submit it to an adviser for review. When a section has been marked complete, advisers will be notified via email, and can then review the section and Approve it, or Reject it with their comments.
PDF Proof
![]()
Users with Adviser privileges can click the PDF Proof icon to render PDF that can be printed locally for review.
You will see an option that allows you to select the sections that will be included in the PDF. Click Select All to select all sections in the book. Once you’ve selected your sections, click OK. The PDF will be generated and will appear in a new window.
The Online PDF is intended for local proofing only, and is not the final production PDF. It is thus lower resolution, and contains a PROOF watermark.
Approve
![]()
Users with Adviser privileges can click the Approve icon to approve a section that has been marked complete by the designer. Before clicking Approve, be sure to review the section in detail for any errors or required changes.
Click Approve once the section is complete and ready for the finished book. The section will be marked as Reviewed. While it has a status of Reviewed, the section will not be able to be checked out for further editing. Click the Reject icon to make the section once again available or editing.
Once all sections have been approved by an adviser, and have a status of Reviewed, it’s time to submit your yearbook for printing. Please see the Submitting Your Yearbook for Print section of this guide for more detail.
Reject
![]()
Users with Adviser privileges can click the Reject icon to reject a section and give the editor an opportunity to make changes. You will be prompted to add a reason that the section has been rejected. Your comment will appear in the Info/Message dialog, and become part of the history of the section.
Once a section has been rejected, the section status will return to In Progress, and the Info/Message icon will update to notify the designer that there is a new comment. Any user can click the Info/Message icon to review the comment.
Advanced Section Management using the Settings Menu
Users with Editor or Adviser privileges can perform advanced section management functions using the menu items that can be accessed by clicking the Settings icon.
Click the Settings icon next to a section, then scroll down to the appropriate menu item, to select a feature.
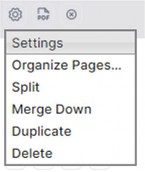
Settings
Select Settings to bring up the Modify Section dialog. Here you can update section details, add and delete pages, and assign users to work on a section.
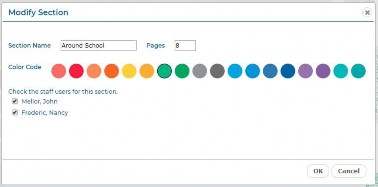
Change the Section Name to rename the section.
Change the Pages to adjust the number of pages in the section. If you increase the page count, new pages will be added at the end of the section. If you decrease the number of pages, pages will be deleted from the end of the section. A warning will appear asking you to confirm. Once pages are deleted they cannot be retrieved.
If you change the page count by an odd number, the updated section will potentially break a spread in subsequent sections. In other words, left-hand pages will become right-hand pages, and right-hand pages will become left-hand pages. If you do this, a warning will appear asking you to confirm. You will not be allowed to break a spread if any of the affected sections have a status of Checked Out, Complete, or Reviewed.
Click a Color Code to choose a color for the section.
Check the box next to the name of the any Staff user(s) to give them permission to edit the section. Multiple users can be assigned to the same section.
Click OK when finished.
Arrange Pages
Select Arrange Pages under the Settings icon to bring up the Arrange Pages dialog. Here you can rearrange and delete pages in a section.
You can only arrange pages for a section with a status of In Progress. You cannot arrange pages for a section with a status of Checked Out, Complete, or Reviewed.
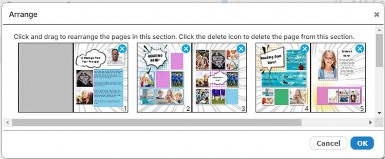
Click and drag a page and then drop it in the desired location.
Click the x at the top of a thumbnail to delete that page from the book.
Click OK when complete. The section will be updated with the new page order.
Split
Select Split under the Settings icon to bring up the Split Section dialog. Here you can split a section into two separate sections.
You can only split a section with a status of In Progress. You cannot split a section with a status of Checked Out, Complete, or Reviewed.
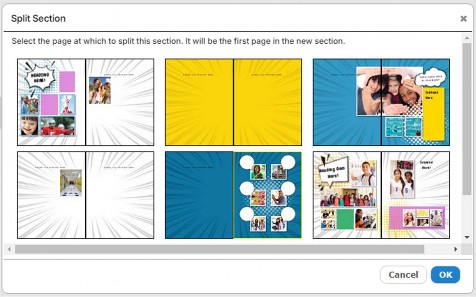
Select the page which you would like to be the first page of the new section.
Click OK when complete. The section will be split at the point you selected, and a new section will be created.
Merge Down
Select Merge Down under the gear icon to merge the current section with the section below it. The two sections will be merged. The current page order will be maintained.
You can only merge two sections that are adjacent to each other in the book, and only if each has a status of In Progress. You cannot merge sections if either of them has a status of Checked Out, Complete, or Reviewed.
Delete
Select Delete under the gear icon to delete the current section.
You can only delete a section with a status of In Progress. You cannot delete a section with a status of Checked Out, Complete, or Reviewed.
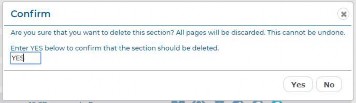
You must type YES into the Delete Confirmation dialog to confirm that you want to delete the section. Then click OK.
![]()
Important! Deletion of a section is permanent and cannot be undone.
![]()
Copy Cover
If you have your book set up with two different Cover types, such as Hard Cover and Soft Cover, you can copy the cover design between covers.

Click the gear icon on a Cover section, then select Copy Cover. You will then be prompted for the location for the copied cover.
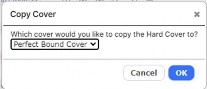
Make the appropriate selection from the dialog, then click OK.
![]()
Important! Each cover type has a different specification as required for printing. Once you have copied a design from one cover type to another, review each cover to make sure everything is properly aligned, and still within the safe area.
![]()
Working in the Section View
The Section View, located on the right side of the Yearbook page, displays a current thumbnail version page, and provides shortcut access to key functionality.
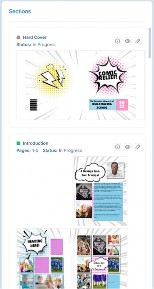
The Section View, located on the right side of the Yearbook page, displays a current thumbnail version of each section in the book, and provides shortcut access to key functionality.
Clicking on a section in the Yearbook Ladder will scroll that section into view in the Section View.
Each section in the Section View is color-coded with the ladder color for that section, and displays the Section Name, Status, and Page Range.
Icons on the Section View provide access to key functionality from the Yearbook Ladder.
Click the Info/Messaging icon to view a history of the section along with any current warnings or errors, and to Add a Comment that will be available to anyone who can view the section.
Click the Preview icon see an online preview of the selected section. You can turn the pages of the preview, and navigate through the entire yearbook.
Click the Edit icon to check out a section of the yearbook and work on its design. You will be taken to the Advanced Design page.
DESIGNING YOUR YEARBOOK
Designing the pages of your yearbook with UBuildABook should be fun and rewarding!
We recommend you spend some time familiarizing yourself with this chapter and the main features of the software before getting started. It’s also ok to play around with the features before starting the actual design process.
Once you have a basic understanding of how the software works, you’ll become an expert in no time!
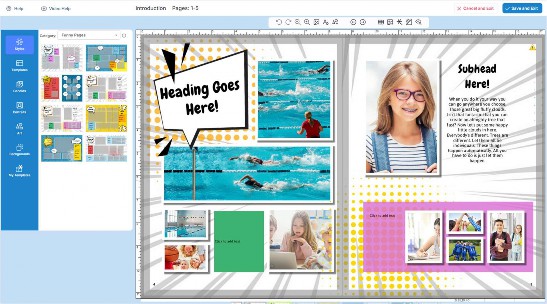
Using the Advanced Design Page
Click the Edit icon next to a section on the Yearbook Ladder where you have editing privileges. You will be taken to the Advanced Design page.
![]()
It’s time to start customizing your yearbook! The Advanced Design page provides a preview of the section you’re working on and allows you to customize each page or spread individually. You can add templates and backgrounds, photos, text captions, and art , and make other design changes.
You can also create your portrait Panel pages, and Index pages, using automated features.
Click the Help Video link at the top of the page for a video overview of the main features.
Click Help to view any current help or warning messages. A message indicator will appear when there is a new help message.
The Section Name is displayed at the top of the page, along with the specific page numbers for that section.
The Main Toolbar across the top of the page, above the section preview, provides access to the main features for working with your yearbook.
The Cancel and Exit button allows you to leave the Advanced Design page without saving any of your changes.
The Save and Exit button allows you to leave the Advanced Design page and save all your changes.
![]()
HOT TIP! Your pages are Auto Saved by the software so there’s no need to worry about having to save them manually, or losing any of your work. Click Cancel and Exit if you want to leave the page without saving anything. If you leave the page without clicking Cancel and Exit or Save and Exit, all changes will be applied.
![]()
The Tab Bar on the left contains all the page design components, which can be dragged and dropped onto the pages of the yearbook.
The Section Preview in the center of the page is your working area, and contains a real-time preview of the section you are working on.
Below the Section Preview, are Page Navigation controls that allow you to scroll between pages of the section.
Image Frame Types: Portrait vs. Candids
Image, or Photo, Frames are empty boxes in a page layout into which you drag portrait or candid photos. Portraits and Candids have different types of image frames; portraits can only be dragged into Portrait frames, and candids can only be dragged into Candid frames.
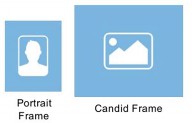
Image frames contain icons that let you know the type of frame. Portrait frames contain a portrait icon, and candid frames contain a landscape icon.
Trim and Safe Areas
A dark gray border around the section preview represents the trim area. You should not place any design art objects within this area, as they will be trimmed off in production.
A light gray border around the preview represents the safe area. You should be careful with any art objects placed within this area, as they will be very close to the edge of the page in the finished book.
Alerts and Warnings
When an error on the page occurs, an Alert dialog will appear, containing a description of the error and information about how to correct it.
Once you dismiss the dialog, a yellow Alert icon will appear on the page at the location of the error. Alert icons will disappear once the issues have been corrected. Note that an icon may signify that there is more than one issue.
![]()
Until the errors have been resolved, the message text will be available by clicking the Help icon at the top left of the page. A message indicator on the Help icon will indicate when there Is a new error.
Common errors include:
You have a low-resolution photo. Choose a different photo or reduce the size of the photo frame.
You may have placed a text frame too close to the edge of the page. We recommend you move the text box inside the gray ‘safe area’ to ensure that it will not be trimmed off in production.
Your pages may have been rearranged, and affect a frame (photo or art ) that was on both sides of the spread. This frame now displays a warning icon. Please review and make any changes.
You may have a Portrait photo that is being overlapped by another photo or design art object.
![]()
IMPORTANT! When an error occurs on the page, you MUST locate and correct it before submitting your final book. You will be responsible for any uncorrected errors that show up in the final yearbook. If you have any questions about a specific error or message, please contact your yearbook provider.
![]()
Using the Main Toolbar
The Main Toolbar provides access to the main features for working with your yearbook. Move your mouse over any of the tool icons to see a description of the tool.
![]()
![]()
Click the Undo and Redo icons to reverse or reapply the previous action. You can undo or redo up to 5 previous actions in a row.
![]()
Click the Zoom In and Zoom Out to enlarge or reduce the preview area to the optimum size for your screen.
![]()
Click the Add Image Frame icon to add a new image frame to the page. You can then drag and drop a photo from the Photos tab into the new frame.
![]()
Click the Add Text Frame icon to add a new text frame to the page. You can then click the T icon on the Text toolbar to add text to the frame.
![]()
Click the Add Shape icon to add a shape to the page, and adjust the Border, Fill Color, Drop Shadow and Transparency. There are several available shapes including Square, Circle, Hexagon, Triangle, Octagon, vertical Line and horizontal Line.
![]()
Click the Previous Page and Next Page icons to move forward and backward through the section.
![]()
Click the Toggle Grid icon to turn on and adjust the grid. The grid will help in aligning text, images and other floating design art objects. Clicking the button will provide a dropdown menu.
Select Show Grid icon to display a grid overlay on the page. Select 1/8”, 1/4” or 1/2” from the Grid menu to choose the spacing between the grid lines.
Items will automatically snap to the grid as you move them. Select 1/8” or 1/4” from the Snap menu to determine the grid increments to which the items will align. Note that the snap increment you choose may be different than the grid spacing.
When you Zoom in to enlarge the page, in largest you will have an additional option of 1/16” in the Snap menu.
Click Show Rulers to toggle Rulers on and off.
![]()
Click the Flip Layout icon to flip the current layout horizontally. Clicking the icon will provide a dialog, with the option to flip only the Left page, only the Right page, or Both pages together. Select your preference, click OK, then the layout will be flipped.
![]()
Click the Save Template icon to save the current page or spread design under My Templates. You will have the option to save the Left side, the Right side, or Both sides of your 2-page spread. You will also have the option to include the Background, and organize your new Template into a Category.
All Saved Templates will be available on the My Templates tab. You can drag and drop them to any page, just like a standard template.
![]()
Click the Adjust Background icon to clear the page background, or adjust the color and lightness of the background. Select Colorize to adjust the color of the background. Select Lightness to make the background lighter or darker. Select Clear Background to remove the background from the page. Select Clear Color to reset the background to its original color. Select Clear Lightness to reset the background to its original lightness.
![]()
Click the Preview icon to see an animated on-screen preview of your book.
Adding Styles
Styles are predesigned spreads, in a wide variety of design choices, that allow you to create beautiful pages quickly and with little design experience. You can use Styles for your entire book, or for individual sections, spreads or even pages.
The selection of Styles that are available in your software can be controlled by an Adviser user. You can add a Style to your section when you create it initially in the New Section dialog.
You can also add or change the style per spread in Advanced Design.
To add a Style to your page, click the Styles tab, then drag and drop your selected style onto the page. Note that styles are designed as two-page spreads and will replace the entire spread. You can also drag a style to a single page.
Once on the page, styles can be modified by changing the templates and backgrounds, and moving design art objects including image frames, text frames, and art objects.
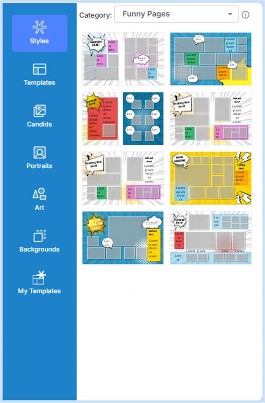
EL, MS and HS Styles
Styles are organized according to Elementary, Middle School and High School.
High School styles each contain eight or more spreads, with section intros for Clubs, Sports, Academics, Student Life and Portraits. HS styles also include Modules for special features such as surveys and scoreboards.
Middle School styles each contain 8 or more spreads, with basic Headers and Subheads, and include a wide variety of styles from playful to sophisticated.
Elementary School styles contain 6 or more spreads, with simple, fun and colorful designs and an emphasis on bright colors, elementary subjects and collages.
Advisers can select which styles to show in the software using the features on the Configure page in the software.
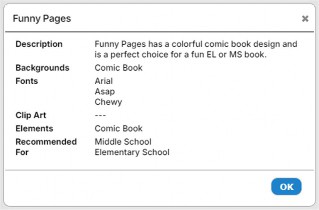
Click on the Info icon in the Styles tab to read information about the current style and its suggested use.
![]()
Tip! Refer to the UBuildABook Content Guides for all the available Styles, Templates, Styles, Art and Fonts. Updated each season, these are available in the Knowledge Base and are excellent tools to aid in your yearbook planning and design!
![]()
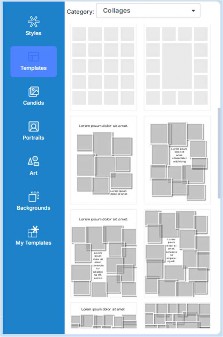
Adding Templates and Backgrounds
The pages of your yearbook are primarily made up of templates and backgrounds.
Templates are page layouts that contain photo frames and text frames. Photo frames contain photos that are dragged directly into the frame. There are different types of image frames for portrait and candid images, denoted by an icon in the frame.
Text frames contain text that is typed into the software and then applied to the frame.
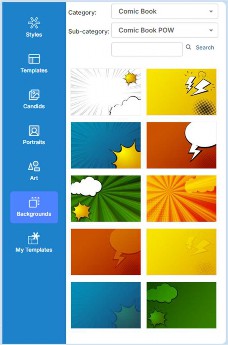
Backgrounds are designs in various categories, which appear behind the templates, and often provide the overall style for the page.
Templates and Backgrounds are located on their respective tabs, to the left of the section preview. You can change the template or background for each page independently, by dragging them to the appropriate page in the spread. Backgrounds can also be added to the entire spread.
Templates are organized into categories. Click on the Templates tab, and then use the Category menu to browse and view the available templates. To change the template for a page, select a template thumbnail, then drag and drop it from left to right onto the page. Note that any existing text and photos will be flowed into the new template.
Backgrounds are organized into categories and sub-categories by style. Click on the Backgrounds tab, and then use the Category and Sub-category menus to browse and view the available backgrounds. To change the background for a spread, select a background thumbnail, then drag and drop it from left to right onto the center of the spread. To change the Background for only the left or right page, drag it to that page.
You can Search for Backgrounds by typing keywords into the Search bar, then clicking Search. Your results will appear below.
![]()
Tip! When you drag a Background onto the page, you will see a green highlight on the preview to indicate whether the background will be added to the left page, right page, or entire spread.
![]()
Working with Candid Photos
Candid Photos are uploaded on the Photos page of the software, and are then available on the Candids tab. When you first click on the Candids tab you will see the photos that are in the same folder as the name of your section. Use the Folder menu to choose a different folder of photos.
To add photos to a page, click on a photo, and drag and drop it from left to right into an image frame on the page. To replace an existing photo, simply drag a new photo onto it.
Click Search to locate all the candid photos containing a particular student. The results will appear in a new dialog.
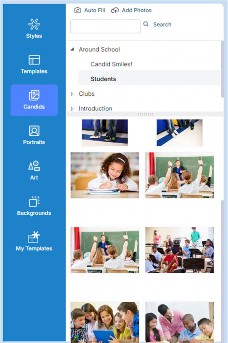
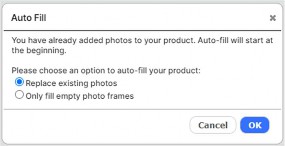
Click Autofill to automatically flow photos from the current folder into the image frames in the section. You will have the option to Replace the existing photos, or to Only fill the empty photo frames. Click the button next to your selection, then click OK. Photos will be flowed throughout the section until there are no more photos, or no more frames.
You can also click the Add Image Frame button on the toolbar to add a new frame to the page. Then click on a photo and drag and drop it onto the new frame.
In addition, you can simply drag a photo from the Photos tab to any empty part of the page, and then release it.
Click and drag on an image frame to move the photo around on the page. Click and drag the handle on any corner of an image frame to scale the image.
Click and drag the handle on the top or side of any image frame to crop the image. Refer to the Editing Photos section for more information about editing candid photos.
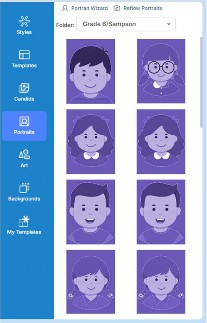
Working with Portrait Photos
Portrait Photos are uploaded on the Photos page of the software, and are then available on the
Portraits tab.
Use the Folder menu on the Portraits tab to choose a different folder of portraits. Click Portrait Wizard to get started building your portrait pages.
Using the Portrait Wizard
To create your Panel Pages, or Portrait Pages, it’s recommended that you use the Portrait Wizard. The Portrait Wizard will automate the design of your pages and manage the placement of portraits.
Once your portrait pages have been created, you can choose to make changes and add design elements using the same advanced tools available for your candid photo layouts.
![]()
Tip! Before you start it’s helpful to have a basic idea of how many portraits you will have per class, and on each page. Then create a Portraits section with the appropriate number of pages. It’s ok to add extra pages just in case, which you can delete later.
![]()
When you’re ready to get started, click on the Portrait Wizard icon, on the Portraits tab.
![]()
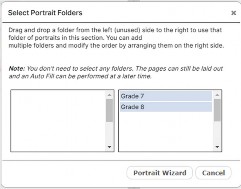
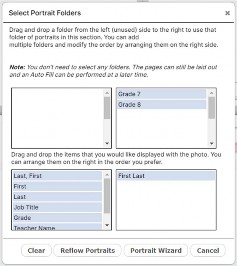
Selecting Your Photos
When you click on Portrait Wizard, the Select Portrait Folders dialog will open. Here you can select the folder, or folders, of portraits that you would like to flow into the section. To select a folder, drag it from the left pane to the right pane. You can flow as many portraits as you’d like into a single section.
![]()
Tip! You may choose to add your portraits later. In this case, skip this step and use the Portrait Wizard to layout your pages without portraits. Choose Auto fill from the Photos tab to flow your portraits later.
![]()
When you’re finished, click OK. The Portrait Wizard dialog will open.
Saved Settings
The Portrait Wizard allows you to easily build and modify your panel pages, while viewing your changes in real time. It also allows you to save and manage your portrait page settings, to simplify page creation and management. Each time you launch the Portrait Wizard, your most recently used settings will be applied. If you have not yet saved any settings, you will be prompted to create a new settings file.
Basic or Advanced Mode
The Portrait Wizard has two different modes of use: Basic mode provides the most popular standard layouts and features and is most suitable for novice users, or users that want to quickly create basic portrait pages. Features in Advanced mode allow for more detailed customization of your panel pages. Don’t worry – you can switch back and forth between these modes based on your needs!
Basic Mode Features
The Portrait Wizard opens in Basic mode. Click the Switch to Advanced button at the top of the page to change to Advanced Mode. You can switch back and forth between modes any time.
This section describes the features available in Basic mode; the following section describes the features in Advanced mode.
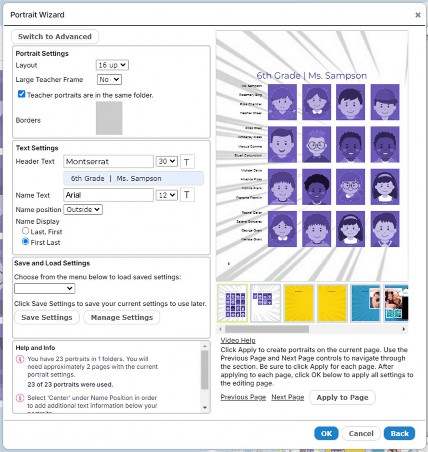
Basic Mode Overview
Adjustments for your portrait pages are organized into Portrait Settings and Text Settings.
The Save and Load Settings feature allows you to save your current Portrait Wizard settings for later use, or for use in another section.
The Preview at the right shows a live update of all settings, with Page Navigation icons below that show the number of pages in the section you are currently working on.
You can apply your current settings to pages in the Preview by clicking the Apply to Page button, which is also located below the Preview. Click the Previous Page and Next Page buttons to navigate through the current section.
Help and Info appears at the lower left of the dialog, to the left of the Preview. The text at the top of the Help and Info section tells you the number of pages you will need, based on the number of portrait photos you have selected and the current portrait settings. This text will update as you make changes that affect the number of pages required.
![]()
Tip! Click the Video Help link to watch the tutorial video when using the Portrait Wizard for the first time. This is a great way to get started!
![]()
Adjusting the Portrait Settings
The Portrait Settings allow you to define and adjust the layout of portraits on the page.
The Layout menu contains the most popular portrait layouts. Select from the menu to specify the number of portraits you would like on each portrait page. Note that the number of pages required may change based on this setting.
If you can’t find a setting that works for your desired portrait page design, click the button to
Switch to Advanced mode, where you will have more options.
Select from the Type menu to change the shape of the portrait frames between standard (rectangular) or oval.
Drag the Borders slider to add a border to the portraits, and to adjust the thickness of the border. Click on the color swatch to change the color of the border.
Working with Teacher Portraits
In Basic mode, you can choose to flow one teacher portrait into a large teacher frame, or to flow multiple teachers into smaller frames ahead of the student portraits.
To add a large frame for your teacher photo, select Yes from the Large Teacher Frame menu.
Check the checkbox if teacher portraits are in the same folder as the student portraits. This will cause the teacher portraits to flow automatically into the first row, with the first portrait flowing into the large frame and the rest flowing into smaller frames. You can designate which portrait is a teacher and set the order that each teacher appears on the page using the controls on the Photos page.
If your teacher portraits are in a different folder than your student portraits, you can drag and drop teacher photos into their frames from the Photos tab.
If you need more than one large teacher frame, click the button to Switch to Advanced mode, where you will have more options.
Adjusting the Text Settings
The Text Settings allow you to define and adjust the attributes of all text on the page.
Use the Header Text functionality to add a text header to the top of the page. Type your text into the text box. Select from the Font menu to change the font. Select from the Font Size menu to change the size of the text. Click on the color swatch to change the color of the text.
Use the Name Text functionality to adjust the type characteristics of the student names. Select from the Font menu to change the font. Select from the Font Size menu to change the size of the text. Click on the color swatch to change the color of the text.
Select from the Name position menu to adjust placement of student names. Select Outside to place the names to the outside of the page. Select Center to place the names below the frames.
Select from the Name lines menu to designate either 1 or 2 lines of space for student names.
Select a Name Display button to choose whether to organize student names by Last Name, First Name or First Name, Last Name.
Alerts
![]()
If you see a yellow Alert icon on your preview, this indicates an error on the page. For example, the amount of text in the student name will not fit in the allotted space. Check the Help and Info section at the lower left corner of the Portrait Wizard dialog for additional information. The Alert icon will disappear when there are no issues remaining.
Applying and Saving to Your Portrait Pages
Click Apply to page to apply the current Portrait Wizard settings to the current page. Refer to the Page Navigation icons at the lower right to confirm the page you are working on.
Click on Previous Page and Next Page to move through the pages in the section. Then click
Apply to page again to apply the settings to each subsequent page.
Portraits will flow onto the pages automatically as you apply the settings. You can change the settings for a page at any time. Be sure to click Apply to page again to apply any changes.
Saving Your Settings
You can save the current Portrait Wizard settings and then apply them to other portrait pages. Click the Save Settings button to save the current settings. You will be prompted to enter a name for your settings. Your settings will be saved to the Save Settings dropdown menu.
Click Manage Settings to Rename or Delete your saved settings.
To apply your settings to another portrait page, open the Portrait Wizard, then select your saved setting from the menu. The Portrait Wizard settings will update. Click Apply to page to apply the settings to the current page.
Click OK to close the dialog and save your changes. Click Cancel to close the dialog without applying any changes. Click Back to go back to the Select Portrait Folders dialog.
Advanced Mode Features
This section describes the features available in Advanced mode; the previous section describes the features in Basic mode. Click the Switch to Basic button at the top of the page to change to Advanced Mode.
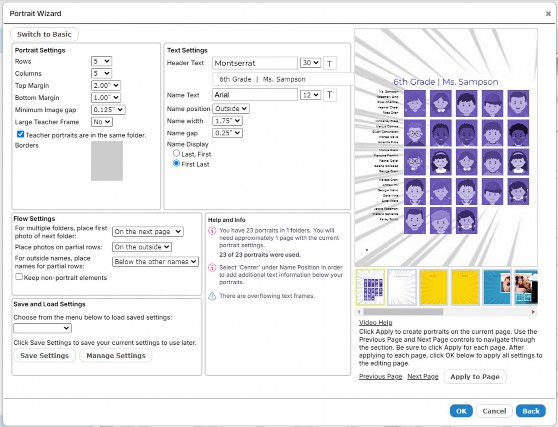
Advanced Mode Overview
Adjustments for your portrait pages are organized into Portrait Settings, Text Settings, and Flow Settings.
The Save and Load Settings feature allows you to save your current Portrait Wizard settings for later use, or for use in another section.
The Preview at the right shows a live update of all settings, with Page Navigation icons below that show the number of pages in the section you are currently working on.
You can apply your current settings to pages in the Preview by clicking the Apply to Page button, which is also located below the Preview. Click the Previous Page and Next Page buttons to navigate through the current section.
Help and Info appears at the lower center of the dialog, to the left of the Preview. The text at the top of the Help and Info section tells you the number of pages you will need, based on the number of portrait photos you have selected and the current portrait settings. This text will update as you make changes that affect the number of pages required.
Video help also appears below the Preview. Click to watch the tutorial video.
![]()
TIP! We recommend that users watch the tutorial video before using the Portrait Wizard for the first time. This is a great way to get started!
![]()
Adjusting the Portrait Settings
The Portrait Settings allow you to define and adjust the layout of portraits on the page.
Select from the Rows and Columns menus to specify the number of rows and columns you would like on your portrait page. Note that the number of pages required may change based on this setting.
Select a Top Margin setting from the menu to add additional space to the top of the page.
Select a Bottom Margin setting from the menu to add additional space to the bottom of the page.
Select a Minimum Image Gap setting from the menu to adjust the minimum amount of space between your portraits. A smaller minimum image gap will bring the portraits closer together and will result in larger portraits.
Select from the Type menu to change the shape of the portrait frames between standard (rectangular) or oval.
Drag the Borders slider to add a border to the portraits, and to adjust the thickness of the border. Click on the color swatch to change the color of the border.
Click the Drop Shadow checkbox to add a drop shadow to the portraits. Select from the color picker to choose a color for the drop shadow. Select from the Transparency slider to adjust the transparency of the drop shadow.
Options for Working with Teacher Portraits
In Advanced mode, you can choose to flow multiple teachers onto the page into large teacher frames, or into smaller frames ahead of the student portraits.
To add larger frames for your teacher photos, select from the Large Teacher Frame menu to add the number of frames you’ll need. If you do not choose to add larger teacher frames, teacher portraits can be placed into smaller frames ahead of the student portraits.
![]()
Tip! The number of available Large Teacher Frames depends on the number of portrait columns you have available. The maximum number of Large Teacher Frames is 3, which will become available when you use 6 or more columns.
![]()
Check the checkbox if teacher portraits are in the same folder as the student portraits. This will cause the teacher portraits to flow automatically into the appropriate teacher frames. You can designate which portrait is a teacher and set the order that each teacher appears on the page using the controls on the Photos page.
If your teacher portraits are in a different folder than your student portraits, you can drag and drop teacher photos into their frames from the Photos tab.
Adjusting the Text Settings
The Text Settings allow you to define and adjust the attributes of all text on the page.
Use the Header Text functionality to add a text header to the top of the page. Type your text into the text box. Select from the Font menu to change the font. Select from the Font Size menu to change the size of the text. Click on the color swatch to change the color of the text, and the transparency and fill color for the text frame.
Use the Name Text functionality to adjust the type characteristics of the student names. Select from the Font menu to change the font. Select from the Font Size menu to change the size of the text. Click on the color swatch to change the color of the text, and the transparency and fill color for the text frames.
Select from the Name position menu to adjust placement of student names. Select Outside to place the names to the outside of the page. Select Center to place the names below the frames.
If you select Outside, the names will appear to the left of portraits on a left-hand-page, and to the right of portraits on a right-hand page. You will see menus to adjust the Name width and Name gap. Change the Name width to adjust the width of the text frames. Change the Text gap to adjust the amount of space between the text frames and portraits.
Select a Name Display button to choose whether to organize student names by Last Name, First Name or First Name, Last Name.
If you select Center, the names will appear below the portraits, and you will have some additional flexibility in adding text.
You will see a Name lines menu that will allow you to adjust the number of lines to be used for student names. You can choose to add between 1 - 4 lines of information below each portrait.
Once you’ve selected the appropriate number of lines, drag and drop the information that you would like to appear on the panel page, from the left to the right.
![]()
IMPORTANT! If you see a yellow Alert icon on any of the portraits in the preview, this might mean that the amount of text in the name does not fit in the allotted space. You’ll see more detail in the Alert section at the lower left of the dialog. Adjust the font size, name position, and other settings until all names fit properly, and the alerts disappear.
![]()
Adjusting the Flow Settings
If you selected more than one folder of photos on the Select Portrait Folders dialog, the Flow Settings will appear, allowing you to determine how to separate the portraits from each subsequent folder, and how you would like a final, partial row of portraits to appear.
In the menu labelled For multiple folders, place first photo of next folders, you can choose between On the next page, On the next photo, or On the next line. This will allow you to control the transition from one folder of class portraits to the next.
In the menu labelled Place photos on partial rows, you can choose between On the left, On the right, In the center, On the inside or On the outside. This will allow you to control the appearance of the final row of portraits, when it contains less portraits than the rows above it.
In the menu labelled Display empty portrait frames, you can choose Yes or No. This will allow you to control whether empty portrait frames should be shown on the page. If you chose to place partial rows in the center, the Display empty portrait frames menu will automatically be set to No.
![]()
Tip! We recommend you do not delete empty portrait frames. It is best to leave them in place, in case you need to add additional portraits to the class later. The Display empty portrait frames feature allows you to hide the frames that are unused, but keep them available in case you end up needing them.
![]()
Click the Keep non-portrait elements checkbox to preserve other elements in your page design when changing your portrait layout. If you do not check this box, the Portrait Wizard will delete existing objects, and floating image and text frames when updating the page.
Alerts
![]()
If you see a yellow Alert icon on your preview, this indicates an error on the page. For example, the amount of text in the student name will not fit in the allotted space. Check the Alerts section at the lower left corner of the Portrait Wizard dialog for additional information. The Alert icon will disappear when there are no issues remaining.
Applying and Saving Settings
Click Apply to page to apply the current Portrait Wizard settings to the current page. Refer to the Page Navigation icons at the lower right to confirm the page you are working on.
Click on Previous Page and Next Page to move through the pages in the section. Then click
Apply to page again to apply the settings to each subsequent page.
Portraits will flow onto the pages automatically as you apply the settings. You can change the settings for a page at any time. Be sure to click Apply to page again to apply any changes.
You can save the current Portrait Wizard settings and then apply them to other panel pages. Enter a name for the settings, then click the Save Settings button to save the current settings. Your settings will be saved to the Save Settings dropdown menu.
To apply your settings to another panel page, open the Portrait Wizard, then select your saved setting from the menu. The Portrait Wizard settings will update. Click Apply to page to apply the settings to the current page.
Click OK to close the dialog and save your changes. Click Cancel to close the dialog without applying any changes. Click Back to go back to the Select Portrait Folders dialog.
Using the Reflow Portraits feature to Flow Your Pages
You can also use the Reflow Portraits feature to create and flow your portrait pages. This is recommended for unique designs and special cases where the Portrait Wizard is not suitable.
To create new Portrait Pages, drag a Portrait Layout to the page from the Layouts tab, or from Special Pages on the Styles tab. You can customize the layout using the tools in the editor.
Click Reflow Portraits to automatically flow portrait photos from the current folder into the layout. When you click Reflow Portraits, the dialog will appear.
To flow your portraits into the current layout, drag the portrait folder(s) you want to use from the left to the right.
Then, drag the data you want to display with the portraits from the left to the right. Finally, click Flow Portraits. Your portraits will flow into the layout.
![]()
Tip! The Reflow Portraits feature can also be used to flow portraits, or reflow portraits, into layouts that were created using the Portrait Wizard.
![]()
Editing Your Portrait Pages
You can use all the design functionality for customizing your portrait pages, including changing backgrounds, adding text and candid photos, and adding art .
You can also delete or move individual portrait frames. The order of the portraits will be maintained, and portraits will reflow as necessary in response to any changes.
Adding Art to Your Pages
The Art tab contains a wide selection of art objects and design elements that can be used to enhance your pages. Click on the Art tab, and then use the menus to browse and view the art library. The available selection of Art can be adjusted by an Adviser.
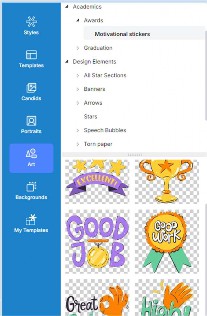
To add an art object to the page, select a thumbnail, and drag and drop it from right to left onto the page. You can then click and drag it to position it on the page.
Click and drag the handle on any corner of the frame to scale to a larger or smaller size.

When you click to select an art object, you will see the Editing Toolbar.
Click the Rotate icon, then select an option from the dropdown menu, to flip or rotate the art object.
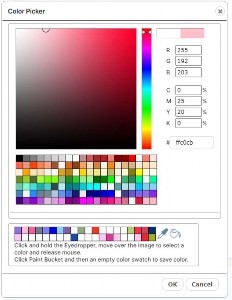
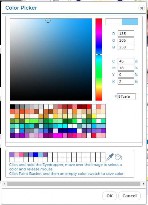
Click the Colorize icon to launch the color picker and change the color of your art object. You can select a color from the available swatches, type in your own RGB or CMYK value, or use the eyedropper to select a color from your page. Click OK to apply the currently selected color to your object.
Click the Delete icon to delete the object.
Click the More arrow, then select Duplicate from the menu to duplicate the object.
Click the More arrow, then select from the Layer menu to move the object forward or backward with relation to other items on the page.
Working with My Templates
The My Templates tab allows you to create your own custom page designs and use them throughout your book.
To save a Template you designed to My Templates, click the Save Template button. A dialog will appear, providing you with some options for saving your template.
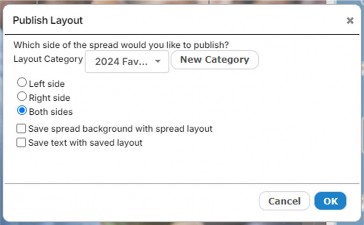
Choose a Template Category from the menu for your saved template. Or, click New Category to create a new category for your template.
Select Left Side to save only the left side of your 2-page spread. Select Right Side to save only the right side of your 2-page spread. Select Both Sides to save both sides of your 2-page spread.
Click Save Background to include the background with your saved template. Any Art will be automatically saved as part of the template.
Once you are ready, click OK. Your newly saved template will now be available on the Saved Templates tab. You can drag and drop it to any other page in your books.
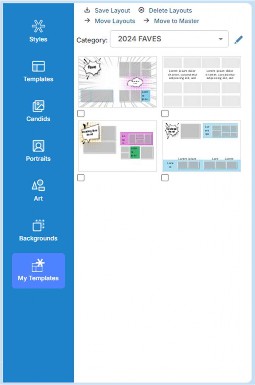
Editing Photos
To edit a photo, click on it to select it, and you will see the Photo Editing Toolbar appear at the top of the photo. Move your mouse over any of the tools to see a description of the tool.
![]()
Cropping Using the Crop Tool
![]()
Click on the Crop tool to crop the photo. The crop dialog will appear. They yellow crop triangle represents the area of the photo that will be cropped. Click in the center of the crop triangle and drag to reposition it. Click and drag a corner to scale it. Click Apply to close the dialog and apply your changes to the photo. Click anywhere outside of the dialog to close it without making any changes.

Adding Borders, Shapes, Drop Shadows and Edge Effects
![]()
Click on the Borders and Edges tool to apply a border, shape, drop shadow, and to choose from a variety of edge effects to apply to the photo. The Borders and Edges dialog will appear.
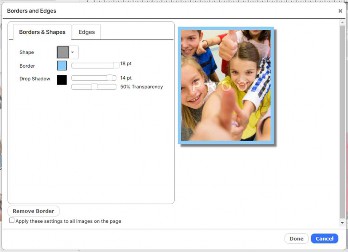
Choose from the Shape menu to change the shape of the image frame.
Adjust the Border slider to add a border and change its thickness. Click on the color swatch to change the color of the border.
Adjust the Drop Shadow slider to add a drop shadow and control its thickness. Click on the color swatch to change the color of the drop shadow. Select from the Transparency slider to adjust the transparency of the drop shadow.
Click on the Edges tab to choose from different edge effects to apply to your photo.
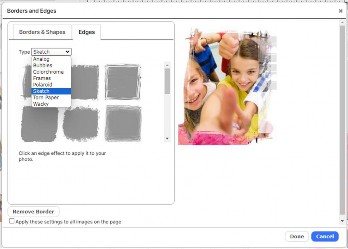
Click Remove Border to remove borders and effects from your photo.
Click Done to close the dialog and apply your changes to the current photo. Check the box to
Apply your settings to all images on the current spread.
Click Cancel to close the dialog without making any changes.
Rotating and Flipping Using the Rotate Tool
![]()
Click on the Rotate tool to rotate or flip the photo. A dropdown menu will appear with several options for flipping your photos or rotating to various angles. Select an option from the menu. Your selection will be automatically applied to the photo.
Choose Custom to type in a value for the rotation, then click Apply to rotate your photo.
Colorizing a Photo
![]()
Click the Colorize icon to launch the color picker and change the color of your photo. You can select a color from the available swatches, type in your own RGB or CMYK value, or use the eyedropper to select a color from your page. Click OK to apply the currently selected color to your photo.
![]()
Tip! When colorizing a photo, the properties of the photo will have an impact on which colors work best. Sometimes different colors work better than others, and sometimes darker or lighter works better, so experiment to find the result you want. You may also want to try the Duotone Effects feature.
![]()
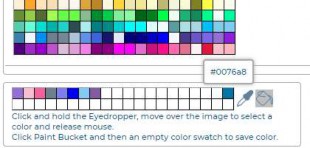
Adding Custom Colors to the Color Picker
You can save custom colors from art objects on the page and add them to the bottom rows of the color picker to use throughout your book.
To add a custom color, click on the Eyedropper tool at the bottom of the color picker, then while still holding down your mouse button, move the cursor around the page to a color you would like to use. Let go of the cursor when you have found a color you like.
Next click the Paint Bucket tool to load the color, then click the swatch you’d like to fill with your new custom color. The color will now be available in the color picker to use throughout your book.
Editing Your Photo
![]()
Click the Effects icon to apply a variety of enhancements and effects to the photo. The Edit Photo dialog will open.
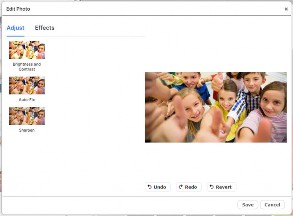
On the Effects dialog you will see a preview of your current photo on the right, and the available corrections on the left. The thumbnails show the actual effect to your current image.
Click a thumbnail to apply the effect to your image. Some of the effects will provide variations at the right, which you can click to apply.
Click Undo to reverse the most recent action. Click Redo to repeat the most recent action. Click
Revert to revert the image to the original.
Click Save to save a copy of the image with corrections.
The following Enhancements are available on the Adjust tab:
Brightness and Contrast
Auto-Fix
Sharpen
The following Effects are available on the Effects tab:
Duotone
Blur
Pixellate
Posterize
Deleting a Photo or Frame Using the Delete Tool
![]()
Click on the Delete tool, then choose Delete Frame from the dropdown menu to delete the entire image frame. Choose Clear Image to only delete the photo and leave the image frame in place.
Advanced Photo Editing
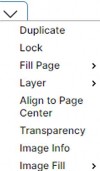
Click on the arrow icon at the right of the Photo Editing Toolbar to access the Advanced Editing
options. A dropdown menu will appear.
Select Duplicate from the menu to duplicate the photo.
Select Lock from the menu to lock the photo so that it cannot be moved. Select Unlock to unlock the photo.
The Fill Page options allow you to fill the page with a photo, or use a photo as the background, in one simple step. Select Fill Page to fill the current page with the photo. Select Fill Page/Send to Back to fill the page with the current photo, then send it to the back, making it the background. Select Fill Spread to fill the whole spread with the photo. Select Fill Spread/Send to Back to fill the whole spread with the current photo, then send it to the back, making it the background.
The Layer options allow you to move the photo forward and backward in relation to the other objects on the page. Select from Bring Forward, Bring to Front, Send Backward, and Send to Back.
Click Transparency to adjust the transparency of the photo. Drag the slider to the desired transparency, ranging from 0% (opaque) to 100% (completely transparent). The photo will update automatically when the slider is adjusted.
Click Image Info for information about the photo, including names of people tagged in the photo.
Select from the Image Fill menu to adjust the placement of the photo in the frame. The Scale to Fit option will fit the entire photo in the frame, even if the frame has a different aspect ratio.
The Scale to Fill option will fill the frame with the photo, from the center out. If the frame has a different aspect ratio than the photo, the photo may be cropped equally on all sides to fit the frame. The Scale to Fill (Top) option will fill the frame with the photo, from the top down. If the frame has a different aspect ratio than the photo, the photo may be cropped on the bottom and sides to fit the frame.
Adding and Editing Text
To add or edit text, click on a text frame to select it, and you will see the Text Editing Toolbar appear at the top of the photo. Move your mouse over any of the tools to see a description of the tool.
![]()
Adding and Editing Text Using the Text Edit Tool
![]()
Click on the Text Edit tool to add text to the frame or edit existing text. The text editing dialog will appear. Type your text into the text box. Select from the Font menu to change the font. Select from the Font Size menu to change the size of the text. Click the Bold or Italic button to change the style of the text. Click the Left, Center or Right Alignment button to change the horizontal alignment of the text. Click the Top, Center or Bottom Alignment button to change the vertical alignment of the text. Click Apply to close the dialog and apply your changes to the photo. Click Apply All to close the dialog and apply the font changes to all text frames on the page. This will not change the font size in the other frames. Click anywhere outside of the dialog to close it without making any changes.
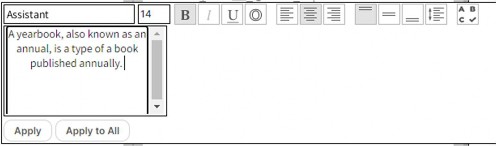
![]()
Tip! Not all the available Google fonts contain styles for Bold and Italic. Therefore, these settings may not work for some of the fonts.
![]()
Applying Color and Borders Using the Borders Tool
![]()
Click on the Borders tool to apply color to the text, and to apply a border and fill to the text frame. The borders dialog will appear. Click on the Text Color swatch to change the color of the
text. Click on the Border color swatch to change the border color for the text frame. Drag the Border slider to adjust the thickness of the border. Click the Fill color swatch to change the fill color for the text frame. Drag the slider to the desired transparency for the fill. Click the Drop Shadow checkbox to add a drop shadow to the photo. Select from the color picker to choose a color for the drop shadow. Select from the Transparency slider to adjust the transparency of the drop shadow.
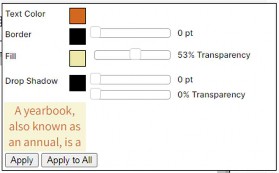
Click Apply to close the dialog and apply your changes to the current text frame. Click Apply All to close the dialog and apply your changes to all text frames in the spread. Click anywhere outside of the dialog to close it without making any changes.
Rotating Text Using the Rotate Tool
![]()
Click on the Rotate tool to rotate the text frame. A dropdown menu will appear with several options for rotating to various angles. Select an option from the menu. Your selection will be automatically applied to the text frame.
Deleting Text or a Text Frame Using the Delete Tool
![]()
Click on the Delete tool, then choose Delete Frame from the dropdown menu to delete the entire text frame. Choose Clear Text to only delete the photo and leave the text frame in place.
Advanced Text Editing

Click on the arrow icon at the right of the Text Editing Toolbar to access the Advanced Editing
options. A dropdown menu will appear.
Select Duplicate from the menu to duplicate the text frame.
Select Expand from the menu to slightly expand the width of the text frame. This feature is helpful for fine tuning text placement.
The Layer options allow you to move the text frame forward and backward in relation to the other objects on the page. Select from Bring Forward, Bring to Front, Send Backward, and Send to Back.
Select Lock from the menu to lock the text frame so that it cannot be moved. Select Unlock to unlock the frame.
Selecting and Editing Multiple Frames Together
You can select multiple frames at once, including image frames, text frames, and art objects, and then apply changes to the entire selection. To select multiple frames, hold the Control (CTRL) key on your Windows keyboard, or the CMD (Apple) key on your Mac keyboard, while you click on each frame.
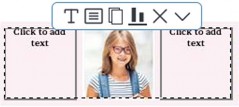
When you have more than one frame selected, you will see a dotted line around the selection, and the Multi-select Toolbar will appear above the selection. The available tools in the toolbar will vary depending on the number and types of frames you have selected. Move your mouse over any of the tools to see a description of the tool.

Adjusting Text for Multiple Text Frames
![]()
If you have multiple text boxes selected, you will see the Edit Text icon in the toolbar. Click the icon to change the font, size, alignment and linespacing for all the selected text boxes at once.
Adjusting Color and Borders for Selected Text Frames
![]()
If you have multiple text boxes selected, you will see the Text Color and Borders icon in the toolbar. Click the icon to change the text color, border, fill color, and drop shadow for all the selected text boxes at once.
Adjusting Borders for Selected Image Frames
![]()
If you have multiple image frames selected, you will see the Borders icon in the toolbar. Click the icon to change the shape, border, and drop shadow for all of the selected image frames at once.
Duplicating Multiple Frames Using the Duplicate Tool
![]()
Click the Duplicate tool to duplicate the selection of frames.
Aligning Multiple Frames Using the Align Tool
![]()
Click the Align tool to align the selection of frames. A dropdown menu will appear.
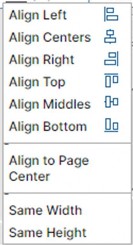
Choose from the available settings to align the selected frames.
Align Left will align the left edges of the selected frames.
Align Centers will vertically align the centers of the selected frames.
Align Right will align the right edges of the selected frames.
Align Top will align the top edges of the selected frames.
Align Middles will horizontally align the centers of the selected frames.
Align Bottom will align the bottom edges of the selected frames. Align to Page Center will center the selected frames on the page. Same Width will adjust all the selected frames to be the same width.
Same Height will adjust all the selected frames to be the same height.
Deleting Multiple Frames Using the Delete Tool
![]()
Click the Delete tool to delete all the selected frames.
Locking Multiple Frames Together Using the Lock Tool
Select the down arrow on the toolbar and choose Lock from the menu to lock the selected items together. When items are locked together, they cannot be moved independently. Choose Unlock from the menu to unlock.
5.12 Adding Page Numbers
Page numbers can be added to your yearbook in the Administration pages of the software, and also on the Configure page if allowed by your Administrator.
Refer to the Configure section of this guide for more information.
The following settings are available for adjusting your page numbers:
Placement: Top or bottom; inside, centered, or outside
Page number margin, which is the distance from the edge of the page (in inches): 0.25, 0.3125, 0.375, 0.5, 0.625, 0.75
Font: Arial, Comic Sans, Times New Roman, Trebuchet, or Verdana Font size (points): 9, 10, 11, 12
Page number style: #, -#-, or #/#
Outline: Yes or No
To add page numbers and to gain access to page number functionality, please contact your Adviser or Administrator.
![]()
IMPORTANT! Page numbers can be added or modified at any time. However, page numbers can’t be added or modified if any sections have a status of Checked Out. Be sure that all sections are checked in before asking your Adviser or Administrator to add or adjust page numbers.
![]()
Page numbers will appear in a text frame on each page in Advanced Design. Selecting a page number on a specific page will provide a toolbar that allows you to change the color, or delete the page number.
5.13 Adding Grad and Biz Ads
If you have the Storefront software enabled, parents and businesses can design Grad and Business Ads online, and then pay for them using a Shopping Cart.
All ads that get ordered will automatically get converted to JPG files, and then transmitted to a new folder on the Manage Photos page called Advertising. You can check the Advertising folder regularly for new Ads. Advisers can also run sales reports for ads on the Adviser Review page.
See the Adviser Review section of this user guide for more information.
Creating an Advertising Section
To add your ads to the book, first create a New Section on the Manage and Design Book page, just as you would create any other section of the book. Name the new section Advertising, and
specify the number of pages you think you will need. You can add more pages, or delete some, later if needed. Choose None for the background style, so you will have blank pages.
Editing Your Advertising Section
Now that you have created an Advertising section, click Check out for editing to open the Advertising section into the Advanced Design page.
On the Advanced Design Page, select the Photos tab. Then click Change Source. Choose the Advertising folder, then click OK.
Your ads will load onto the Photos tab. Hold your mouse over the thumbnail for each ad and you will see whether it is a 1/8-page, 1/4-page, 1/2-page or Full page ad. You will need to know this in order to plan your ad page templates.
Next, click the Templates tab. Select Grad and Biz Ads from the Category menu. You will see a selection of ad page templates, with various combinations of 1/8-page, 1/4-page, and 1/2-page frames, and a Full page template. Select a template according to your current ad selection, and drag it onto a page.
Next click the Photos tab. Then drag each ad into the appropriate sized frame on the template. Repeat this process to create all of your ad pages.
Building an Index
The Index feature allows you to create a set of index pages in your book, that lists all students in alphabetical order along with the pages number(s) of the book in which they appear.
Student names and their corresponding page numbers are automatically added to the index for all Portrait photos.
For Candid photos you will manually add names for any photos that you would like referenced in the index. Please see the section Previewing Photos, and Adding Captions and Index Entries for instructions on how to add names for your candid photos.
Creating an Index Section
Before you can create your index you will need an Index Section in your book. You can create an Index Section on the Yearbook page, just as you would create any other section of the book.
Please refer to Adding New Sections to Your Book for instructions on creating a section. Name the new section Index, and specify the number of pages you will need.
Note that the formatting of the Index pages, and the number of students, will affect the number of pages needed for the Index Section. You may want to add a few more pages than you think you will need. You can delete any unneeded pages pater.
Editing Your Index Section with the Index Wizard
Now that you have setup your Index Section, you can begin editing it. Go to the Yearbook page and click the Edit icon to edit your Index section. The section will open into Advanced Design.
Next, click on the Templates tab, and then select Index Pages from the Category menu. Here you will see a variety of templates to choose from for your Index pages. Some of the templates have photo frames that will allow you to add photos to the index pages. Choose the templates you want to use, and drag them onto your pages. Note that you can change the templates at any time in the future.
Next, click on the Index Wizard button.
![]()
The Index Wizard dialog will appear.
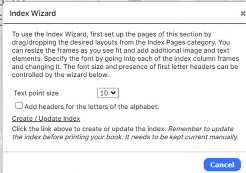
Click on Create /Update Index, and all of your student name information will automatically be flowed into the Index.
Click on the Add headers for letters of the alphabet checkbox to add a capital letter at the beginning of each letter of the alphabet in the Index. This will provide some additional organization and is helpful for a large index.
When the index has been successfully created you will get a message to confirm that the Index was completed and that all index information fit in the templates provided.
If there was not enough room in your templates to fit the entire index, you will get a message that asks you to either add additional frames or change the point size. In this case you can use the Text point size drop down menu to change the text to a smaller size, and then click Create / Update Index. You can also drag a different template with more room for index entries, such as
a 3-column template with no images, onto the page. Or, you can add additional pages to your Index section.
Once you have your Index section template the way you want it, click the Create/Update Index
at the bottom of the wizard.
![]()
Important! Always remember to update your index in the Index Wizard as a final step before submitting your book for proofing and approval. This will make sure that the index is up to date with all of the changes in the book.
![]()
THE PHOTOS PAGE
On the Photos page you can add and organize photos and art for your yearbook.
This page is accessible by users with Adviser, Editor, Staff, or Photographer privileges. If you don’t see this page, you have not been provided access.
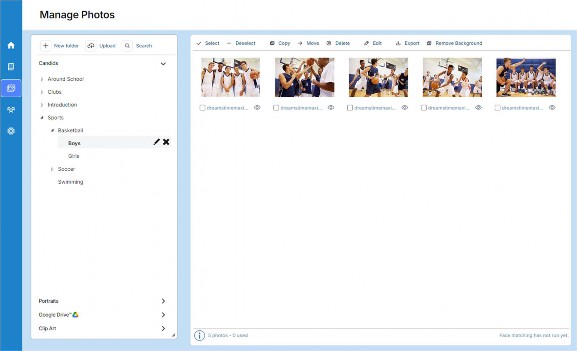
Face-Matching and Auto-Tagging of Photos
Face-Matching saves a lot of time for yearbook staff! This safe technology runs in the background and automatically tags candid photos with student names, based on the portrait photo and name provided, with a very high degree of accuracy.
With Face-Matching, you will no longer need to spend time manually identifying and tagging students in photos.
It also allows search of all photos for students by name, and provides detailed coverage reports with detail on student placement in the book.
Here's How Auto-Tagging Works!
Face Matching must be enabled on the Photos page before it will run. Once enabled, the Face Matching technology will automatically analyze the face in each portrait for unique facial
characteristics, which are very much like a fingerprint. It will then associate the data for each face with the name that was already provided for each student.
Next, the software will analyze all candid photos using this database, and add the name to each recognized face. In multiple places in the software, it will display the name for each matched face that's located in each candid photo, along with the opportunity to review and edit.
Complete, automatic, accurate tagging of all candid photos with visible student faces will save you lots of time, allow for better captions, accurate indexing, more equity among students in the yearbook, and more! Pretty cool, huh?! Learn more in the Knowledge Base.
Organization of the Manage Photos Page
Main features on the Photos page are organized on the left in collapsible tabs. Images are organized into folders on each tab.
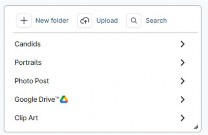
Clicking a tab will make it active. Clicking a folder on a tab will display thumbnails of the images in that folder in a contact sheet, on the right half of the page.
Features for managing the images are located in a toolbar along the top of the contact sheet.
The Candids, Portraits and Art tabs contain the three main types of images that can be managed on this page. If configured, you may also see tabs for Photo Post and Google Drive. These tabs provide additional sources for obtaining photos for your yearbook.
A checkmark icon on a photo thumbnail indicates that the photo has already been used in the book. A plus icon indicates that the photo has been used more than once in the book.
Green or Yellow icons indicate auto-tagging status.
Note that the available features may be different based on the selected tab and your user permissions.
Working with Candid Photos on the Candids Tab
The Candids tab contains all non-portrait photos to be used in your yearbook. These can include candid photos, sports and club photos, etc.
Candids are organized into folders and subfolders. For each section that you created on the Yearbook page, a corresponding folder was automatically added on the Candids tab. You can add photos for each specific section to these folders, and you can also add your own folders and subfolders.
Adding Photos for Use in Your Yearbook
In order to make photos available for use in your yearbook you will need to upload them into the software. Candid photos should be RGB JPG or PNG files.
To upload photos from your PC or other device, select the folder you want to upload your photos into, then click the Upload button at the top of the tab.
![]()
Next click Add Files, and locate the photos that you want to upload. Select the specific photos you want to upload, then click Open to start the upload process.
Progress indicators will provide status during the upload process, and you will be notified when it is complete.
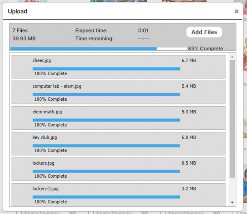
Managing Your Candid Photos Adding a New Folder
Click the New Folder button to add a new folder for organizing your photos. Enter a name for the folder when prompted, then click OK.
![]()
Renaming or Deleting a Folder
Click the Rename folder icon next to a folder to rename the folder. Enter a new name for the folder when prompted, then click OK.
Click the Delete folder icon next to a folder to delete the folder.
![]()
Managing and Previewing Auto-Tagged Candids
A Green Auto Tagging icon on any candid thumbnail indicates that faces have been identified in this photo, and names have been added (tagged). You can mouse over the icon to see the names.
A Yellow Auto Tagging icon on any candid thumbnail indicates that there are faces in this photo that have not been identified.

To Preview a photo in a larger window, manage Auto-tagging, manually tag names, and add
Notes, click the Preview/Info icon, at the lower right of any photo thumbnail. The Preview/Info dialog will appear.
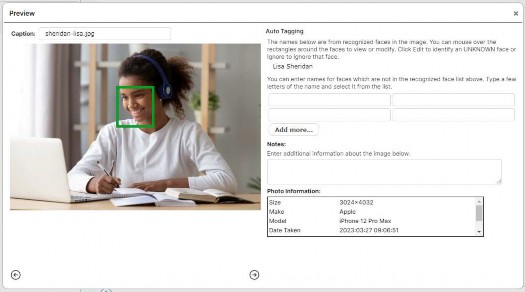
Click the Left and Right arrows to scroll through all of the Photos in the current folder. To change the name of a photo, type the new name into the Caption field.
The Auto Tagging section displays the names for all recognized faces in the image, along with a corresponding rectangle over each face.
Mouse over the rectangle to see the portrait that was used to determine the name of the person in this photo. Click Edit to change the name. Click Ignore to ignore the selected portrait.
A Green rectangle indicates high certainty that the name is accurate, based on the data provided.
A Yellow rectangle indicates low or medium certainty, or an unsuccessful match. Click Edit to correct the name.
A Blue rectangle means that the name was added manually or corrected manually.
You can also manually add names for people who are in the photo, but not recognized by the software. Type these names into the space provided. Type a separate name into each field for each person. Click Add more… to add more space for additional names.
All tagged names will be referenced in the Index with the appropriate page number for the photo. Tagging also allows for students to be searched for by name, throughout the book.
Enter any additional information about the photo in the Notes field. This will be helpful for developing captions for the photos in your book.
Searching for Candid Photos
Click the Search button to search for photos containing a specific person. Type the first few letters of the first or last name of the person you are searching for, then select the name from the list that appears, and click Search.
Candid photos are searched based on the Index information in your photos. For more information about adding information to your photos, see the section Previewing Photos, and Adding Captions and Index Entries.
![]()
Photo Organization Using the Toolbar
You can select a photo by clicking it, or by clicking the checkbox below it. A checkmark will appear to indicate that the photo has been selected. Deselect a photo by clicking it, or the checkbox, again. You can also select multiple photos at a time.
Use the features on the toolbar to organize the photos in a folder.
![]()
Click Select and then choose from the menu to Select All, Select Used or Select Unused photos in the current folder.
Click Select All to select all photos in the currently active folder.
Click Select Used to select only the photos in the current folder that have been used in the book. These photos display a checkmark icon.
Click Select Unused to select only the photos in the current folder that have not been used in the book.
Click Deselect to deselect all photos in the current folder.
Click Copy to copy the currently selected photos to another folder. The Copy selected photos
dialog will appear. Select a destination folder for the photos, then click OK.
Click Move to move the currently selected photos to another folder. The Move selected photos
dialog will appear. Select a destination folder for the photos, then click OK.
Click Delete to delete the currently selected photos.
Click Edit to the edit a photo. You can only have one photo selected to use the editing feature.
Click Export to export the selected photos to your local disk for archival purposes. Photos will be added to a zip file. Click where instructed to download the file.
Editing Your Photos
You can make corrections to a photo and add fun and creative filters and effects. To edit a photo, select it, and then click Edit. The photo will be opened into the Photo Editor.
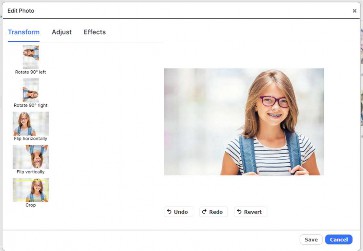
On this page you can easily apply corrections or creative effects to your photos. Thumbnails for the effects show the current photo with the effect applied.
Simply click to Apply an effect. Click Undo to reverse the effect, and Redo to reapply the last effect. Click Revert to revert to the original image. Click Save to save a copy of the image with the current changes.
There are three main categories of functionality:
On the Transform tab, you can Rotate, Flip and Crop your photo.
On the Adjust tab, you can apply basic image corrections including Brightness and Contrast, Auto-fix and Sharpen.
On the Effects tab you can apply Duotone effects, plus Blur, Pixellate and Posterize.
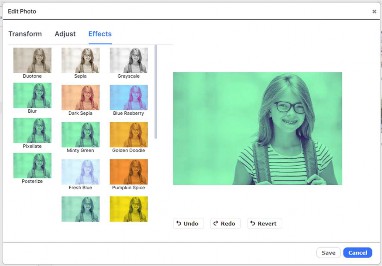
Working with Portraits on the Portraits Tab
The Portraits tab contains your school portraits. These may already be uploaded onto the site by your portrait studio or yearbook provider, or provided to you for uploading to the site. If you are unsure, please check with your yearbook administrator.
Adding Portraits for Use in Your Yearbook
You will need you your Portraits available on a CD that conforms to the PSPA standard. To get started, place the PSPA CD in your disc drive, or copy the contents of the CD to your hard drive.
Click the Portraits tab on the Photos page. Then, click the Portrait Import button at the top of the Portraits tab.
![]()
The Portrait Import dialog will launch.
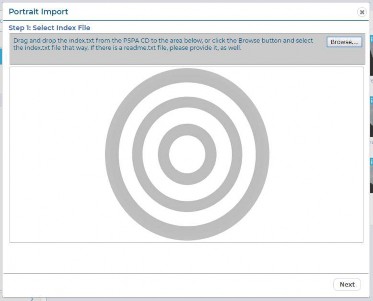
Step 1: Select Index File
The first step to uploading portraits is to upload your PSPA Index file, which contains an index of all of the files on the CD. The file may be named index.txt or something similar.
Click Browse, locate the folder that contains the index file, and then click OK.
Or, you can drag and drop the file directly from your hard disk onto the target in the uploader. Click Next.
Step 2: Define Index Layout
The contents of the index file will be displayed in the Portrait Import dialog.

The contents of the index file will be organized into columns. Use the dropdown menus to specify the columns that correspond to the contents of the index.
Using the example above as a reference, you can see that Column 2 lists the name of the Image Folder, Column 3 lists the Image File Name, Column 4 lists the Grade, Column 5 lists the Last Name, and Column 6 lists the First Name.
Use the Folder Key menus to specify how you would like your portraits organized in the software. For example, if you choose Grade, your portraits will be placed in folders according to the grade of the students. If you choose Teacher, the portraits will be placed in folders according to teacher.
You can choose more than one Folder Key based on the information available in the index file. For example, if you choose Teacher for Folder Key #1, and then Grade for Folder Key #2, portraits will be organized in folders labelled Grade/Teacher.
Once you have made your selection, click Next.
Step 3: Add Portrait Files
If the software could not find them, you may be prompted to locate and add your portrait files. Click Browse, locate the portrait files on the CD or your hard disk, select them, and then click OK.
Or, you can drag and drop the files directly onto the target in the uploader.
Click Next.
Step 4: Select Portraits to Upload
The list of portraits will be displayed in the Portrait Import dialog.
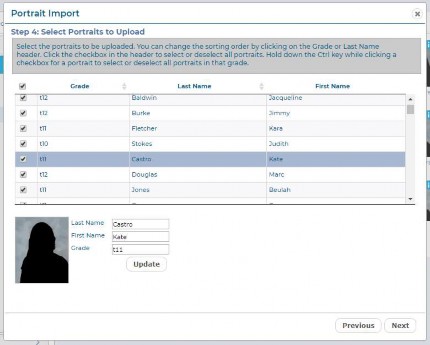
Your portrait photos will be listed according to the columns you specified on the previous screen.
You can edit any mistakes by clicking on the specific portrait, and making changes in the Last Name, First Name, and Grade fields at the bottom of the screen. Click Update after making any changes.
Click the Grade heading at the top of the column to sort the portraits by grade. Click the Last Name heading at the top of the column to sort the portraits by grade.
Next, select the portraits you would like to upload. To select all portraits, click the checkbox at the top of the first column. Click the checkbox again to deselect all of the portraits.
To select individual portraits, click the checkbox next to each portrait that you would like to upload.
To select an entire Grade, hold the Control Key on your keyboard, then click the checkbox next to a portrait for the grade you want to select. All portraits for that grade will be selected.
Click Next.
Step 5: Review Upload Folders
You will be prompted to review and confirm the portrait folders as a final step.
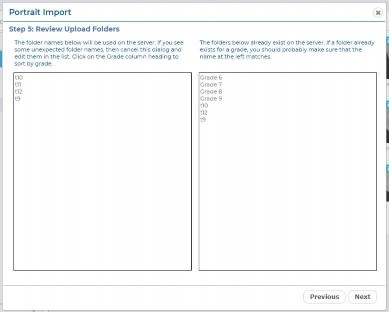
The folder names to the right represent portrait folders that already exist in the software from any previous portrait upload sessions. The folder names on the left represent new folders that will be created for this upload.
Review the information to confirm that it is correct. Click Next. The upload process will begin.
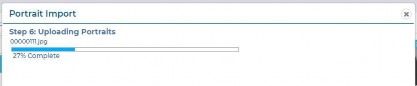
You will see a progress bar while the portraits are being uploaded. Once the upload is complete, the Portrait Import dialog will close and you will be returned to the Portraits tab on the Manage Photos page. You should see your new portraits organized in folders in the Portrait Folders section of the Portraits tab.
![]()
Tip! If you have uploaded a large amount of portraits, it may take a few minutes for them to appear after the Portrait Import dialog has closed. If they still do not display after a few minutes, try refreshing your browser.
![]()
Managing Your Portraits
Adding a New Folder
Click the New Folder button to add a new folder for organizing your portraits. Enter a name for the folder when prompted, then click OK.
![]()
Renaming or Deleting a Folder
Click the Rename folder icon next to a folder to rename the folder. Enter a new name for the folder when prompted, then click OK.
Click the Delete folder icon next to a folder to delete the folder.
![]()
Searching for Portrait Photos
![]()
Click the Search button to search for portrait photos containing a specific person. Type the first few letters of the first or last name of the person you are searching for, then select the name from the list that appears, and then click Search. Portrait photos are searched based on the Index information in your photos.
Printing your Portraits for Proofreading.
Click the Print button to print your portraits for proofreading. The Print Portraits dialog will appear. Select the folders you would like to print, then click OK. A PDF will be generated, which you can print to your local printer.
![]()
Changing Portrait Information and Prioritizing Teachers
To Preview a portrait in a larger window, change the Name, Grade and other info, view Portrait Info, and specify Teacher Portraits and Priorities, click the Preview/Info icon, at the top right of any photo thumbnail.
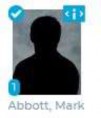
The Preview/Info dialog will appear.
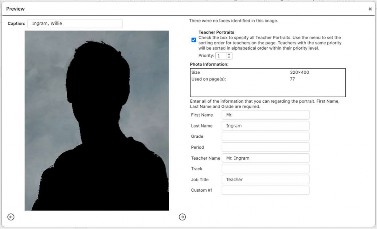
Click the Left and Right arrows to scroll through all of the Portraits in the current folder. To change the Caption for a portrait, type the new name into the Caption field.
To change or add the Last Name, First Name, Grade, Home Room, Teacher Name, Title, or Job Title for the portrait, type it into the appropriate field.
If your teachers are in the same folder as the student portraits you can make them appear in the first position(s) on the class portrait page, or automatically flow into a larger teacher frame.
Check the Teacher Portraits checkbox to specify all teachers in the folder. All portraits with the Teacher Portrait checkbox checked will flow into the first positions on the portrait page, regardless of alphabetical order.
If you have selected more than one portrait as a teacher, you can adjust the order in which they appear by selecting a number from the Priority menu. The Priority for each teacher will appear on the thumbnail in the contact sheet.
If you select the same Priority for more than one Teacher Portrait, the portraits will appear on the portrait page in alphabetical order, within that priority level.
Portrait Organization Using the Toolbar
You can select a portrait by clicking it, or by clicking the checkbox below it. A checkmark will appear to indicate that the portrait has been selected. Deselect a portrait by clicking it, or the checkbox, again. You can also select multiple portraits at a time.
![]()
Use the features on the toolbar to organize the portraits in a folder. Click Select All to select all of the portraits in the current folder.
Click Select Used to select only the portraits in the current folder that have been used in the book. These portraits display a checkmark icon.
Click Select Unused to select only the portraits in the current folder that have not been used in the book.
Click Deselect to deselect all portraits in the current folder.
Click Copy to copy the currently selected portraits to another folder. The Copy selected photos
dialog will appear. Select a destination folder for the portraits, then click OK.
Click Move to move the currently selected portraits to another folder. The Move selected photos
dialog will appear. Select a destination folder for the portraits, then click OK.
Click Delete to delete the currently selected portraits.
Click Edit to edit a portrait. You can only have one portrait selected to use the editing feature.
Click Edit Metadata to correct or add any information from the Index file. This feature allows you to make changes to the portrait data after the portraits have been uploaded.
Click Export to export the selected portraits to your local disk for archival purposes. Portraits will be added to a zip file. Click where instructed to download the file.
Automatic Updates
When you make changes to your portraits, the layout of existing portrait pages will update automatically if needed. Some changes that may cause your existing portrait pages to update automatically include:
Changing or correcting the first or last name associated with a portrait
Adding a portrait or portraits to a class folder
Removing a portrait or portraits from a class folder
Moving a portrait or portraits from one class to another
Depending on your layouts, and the specific changes you made, your pages could be significantly altered. An alert may appear under the Help menu, on the Photos page, or on the Advanced Design Page, suggesting that you review your portrait pages after any changes have been made.
![]()
IMPORTANT! If you make any changes to your portraits that may affect the layout of existing portrait pages, it is very important that you review the pages in Advanced Design. You can then make sure that everything looks the way you want, and make adjustments as necessary.
![]()
6.5 Using Photo Post to Collect Photos
Photo Post is a feature that allows you to obtain candid photos and portraits, through a secure web page, from your school community of students, parents, teachers and supporters. You will be able to review submitted photos, and select any that you would like for inclusion in the yearbook.
Photos can be submitted via PhotoPost from any supported browser on any supported device, including Windows, Mac, Apple iOS, Chrome OS and Android OS.
![]()
Tip: Photo Post is a great way to obtain additional candid and portrait photos for your yearbook from students, families and other supporters!
![]()
Photo Post must be enabled in order to be used. If you do not see a Photo Post tab on your Photos page and would like to use it, contact your Administrator or Yearbook provider.
Inviting Someone to Submit Photos
To invite someone to use Photo Post, click on the Photo Post tab, then click New folder to add a new folder for your photos. Enter a name for the folder when prompted, then click OK.
Next, click the Invite button in the toolbar to invite someone to submit photos to your folder. The Invite dialog will appear.
Type your email address, the email address for the recipient, a subject, message, and signature into the appropriate text fields. Then click the Invite button. The email will be sent to the recipient, along with a link to a secure page where they can click Upload to upload their photos, along with information about each photo.
![]()
Tip! Photo Post users will not be able to see other user’s photo submissions, or any yearbook photos, or access the yearbook software.
![]()
Other Ways to Use PhotoPost
You can also e-mail the PhotoPost link directly to users from your e-mail account, from an email marketing application such as Constant Contact, or post it to your school’s website. Anyone with the link will be able to upload photos to the site.
To obtain the link for your site, click the Invite button, and add your own e-mail in the To field. Then click OK to send the email. You will receive an email with a link that you can use to direct users to PhotoPost.
Choosing Photos for Your Yearbook
Once photos have been submitted using Photo Post, they will appear in their respective folders on the Photo Post tab.
To preview and scroll through your submitted photos in a larger window, click the Preview/Info
icon, at the top right of the photo thumbnail. The Preview dialog will open.
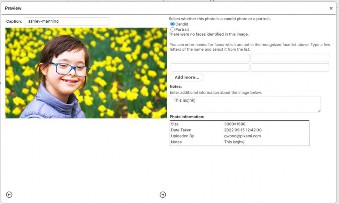
Click the Left and Right arrows to scroll through all of the photos in the current folder.
In order to use submitted photos in the yearbook, you will need to move them to a Candids or Portraits folder. You can select a photo by clicking it, or by clicking the checkbox below it. A
checkmark will appear to indicate that the photo has been selected. Deselect a photo by clicking it, or the checkbox, again. You can also select multiple photos at a time.
Next, use the features on the toolbar to move or organize the photos. Click Select All to select all of the photos in the current folder.
Click Deselect to deselect all photos in the current folder.
Click Move to move the currently selected photos to a folder on the Candids or Portraits tab. The Move selected photos dialog will appear. Select the appropriate folder for the photos, then click OK. Your submitted photos have now been moved and are ready to be used in your yearbook!
After you’ve moved the photos that you’d like to use in your yearbook, it’s recommended that you delete any submitted photos that you do not plan to use. Click Delete to delete the currently selected photos.
Click the Delete folder icon to delete the folder.
Importing Photos from Google Drive
You can import photos directly from Google Drive for your yearbook.
To get started. Click the Google Drive tab. A Google dialog will appear asking you to Sign In to your Google Account. Select the account you would like to use. You will now be logged into Google Drive.
Your Google Drive folders will appear on the Google Drive tab. Select a folder to view its contents. Note that only RGB JPG files will be uploaded to the software.
![]()
Tip: If your Google Drive photos do not appear, try refreshing your browser.
![]()
Nobody will be able to see your photos on the Google Photos tab unless they are logged into your account.
In order to use the Google Drive photos in the yearbook, you will need to copy them to a Candids folder. Select a photo by clicking it, or by clicking the checkbox below it. A checkmark will appear to indicate that the photo has been selected. Deselect a photo by clicking it, or the checkbox, again. You can also select multiple photos at a time.
Next, use the Copy feature on the toolbar to copy the photos to a Candids folder. Click Select All to select all of the photos in the current folder.
Click Deselect to deselect all photos in the current folder.
Click Copy to copy the currently selected photos to a folder on the Candids tab. The Copy selected photos dialog will appear. Select the appropriate folder for the photos, then click OK. Your Google Drive photos have now been copied and are ready to be used in your yearbook!
Working with Art on the Art Tab
The software contains a standard set of art objects for use in designing your pages. In addition, you can add your own art objects. To use this feature, click on the Art tab.
![]()
Tip! If you would like to create and add your own art , it should be saved as a .PNG file, with enough resolution to provide good print quality. We recommend an approximate size of 1200 x 1200 pixels, which will allow you to scale the art up to 4 inches square while maintaining good 300 dpi print quality. For irregularly shaped art , the background should be transparent.
![]()
Adding a New Folder
When you are ready to upload your own art , click the New folder to add a new folder for organizing your art in the software. Enter a name for the folder when prompted, and then click OK.
Renaming or Deleting a Folder
Click the Rename folder icon next to a folder to rename the folder. Enter a new name for the folder when prompted, then click OK.
Click the Delete folder icon next to a folder to delete the folder.
Uploading Your Own Art
To upload your Art from your PC, select the folder you want to upload your art into, then click the Upload button at the top of the tab.
Next click Add Files, and locate the Art files that you want to upload. Select the specific files, then click Open to start the upload process.
Progress indicators will provide status during the upload process, and you will be notified when it is complete.
To Preview Art in a larger window and change the Caption, click the Preview/Info icon, at the top right of any photo thumbnail. The Preview/Info dialog will appear.
To change the name of the Art , type the new name into the Caption field.
Click the Left and Right arrows to scroll through all of the Art in the current folder.
Art Organization Using the Toolbar
You can use the additional features to manage your own custom Art , but you cannot make modifications to the standard set of Art . If you try to make any changes that are not allowed you will see an alert message.
You can select a photo by clicking it, or by clicking the checkbox below it. A checkmark will appear to indicate that the photo has been selected. Deselect a photo by clicking it, or the checkbox, again. You can also select multiple photos at a time.
Use the features on the toolbar to organize the Art in a folder. Click Select All to select all of the Art in the current folder.
Click Deselect to deselect all Art in the current folder.
Click Copy to copy the currently selected photos to another folder. The Copy selected photos
dialog will appear. Select a destination folder for the Art , then click OK.
Click Delete to delete the currently selected Art .
THE USERS PAGE
In order to login and work on the yearbook, a user must first be added to the site. On the Users page you can add new users, and assign them roles based on their individual responsibilities.
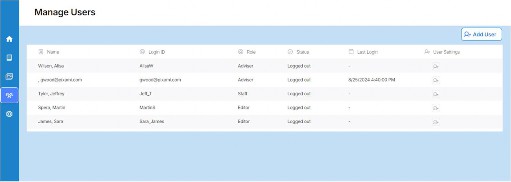
This page is accessible only by users with Adviser privileges. If you don’t see this page, you have not been provided access.
Understanding User Roles
Each user of the software will be assigned a Role, which will determine how much access the user has to the software, and to the yearbook. User Roles will be assigned when a User is created, and can be changed at any time.
Below is a description of each User Role.
Viewer: Users with the Viewer role can only view the yearbook using the Preview feature. They will have no ability to edit or otherwise modify the book. This role should be applied to anyone who would like to view progress of the book, but is not an active participant.
Photographer: Users with the Photographer role can upload and manage all photos and art on the Photos page. This role should be applied to those responsible for taking and/or organizing photos for the sections of the yearbook.
Staff: Users with the Staff role can perform all of the above, plus edit the yearbook for the sections which they were assigned, on the Yearbook page. This role should be applied to those responsible for creating and designing individual sections of the yearbook, such as designers and copywriters.
Editor: Users with the Editor role can perform all of the above, plus create sections, organize the yearbook, and edit any section on the Yearbook page. This role should be applied to those responsible for organizing the yearbook.
Adviser: The Adviser role provides full access to the software. Users with this role can perform all of the above, plus modify user accounts and access levels on the Users page, and review then
approve or reject sections, and submit the final yearbook for printing on the Yearbook page. An administrator or teacher would typically be assigned to this role.
Adding Users
To add a new user, and assign them a Role, click the Add User button.
![]()
The Add User dialog will appear.

Enter a Login ID for the user. Next, enter the users First Name, Last Name, and a password. This can be an e-mail address, but it does not need to be.
![]()
Tip: The Login ID can be an e-mail address, but it does not need to be. If an e-mail address is used, the user may receive communication from the software regarding major activities and status changes in the book. This is particularly helpful for Advisers.
![]()
Select a Role for the user from the User Role menu.
If the Staff Role is selected, check the box next to a section to assign it to the user. This will allow the user to check the section out for editing. Multiple users can be assigned to the same section. You can also add or change user assignments any time.
Click OK when finished. The user has now been added, and can log in any time.
Updating Users with User Settings
Click the User Settings icon next to a user to change the user’s Role, update their Name and Password, view their activity on the site, or Delete them. The Update User dialog will appear.
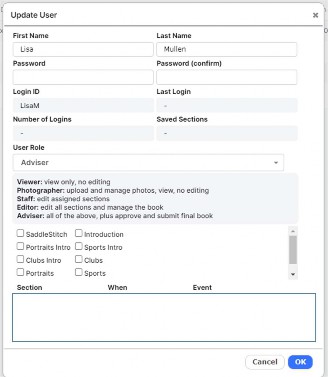
To change the user’s First Name, Last Name, or Password, type the new information into the appropriate field.
To change the user’s Role, select a new Role for the user from the User Role menu.
If the Staff Role is selected, you can change the sections that are assigned to user by checking or unchecking the box next to any section.
You can view a summary of the user’s activity under Last Login, Number of Logins, and Saved Sections. In addition, the Activity Log at the bottom of the dialog provides a complete history of the user’s Activity.
THE SALES PAGE
The Sales page provides a real-time sales report for any items that are being sold in the E- Commerce Storefront for your school. This includes Yearbooks, Ads, Personalized Yearbook pages and Supplements, and any other fundraising products. Please talk to your yearbook provider regarding the availability of products for sale in the Storefront.
The Sales Page is only accessible by users with Adviser privileges. If you don’t see this page, you have not been provided access.
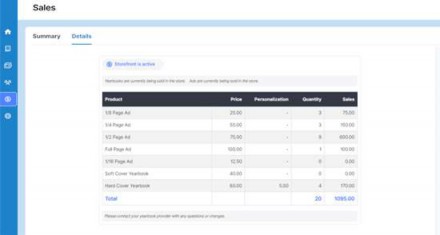
Viewing a Summary Sales Report
When you access the Sales page, you will see the current status of the Storefront at the top of the page. Click the storefront link to view your active store in a new browser tab.
Below the status. If your storefront is enabled you will see a summary report of recent sales, organized by product, with product, pricing and quantity information, and total sales to date.
Contact your yearbook provider to make any changes such as enabling or disabling your storefront, and changing products or pricing information.
Viewing a Detailed Sales Report
Click on Details to view a detailed Sales Report.
Choose a Start Date and End Date, and then click the Refresh button, to view a basic sales report for a specific time period. Items in the report are organized by product category. Click on the Plus icon to see more detail for each product.
Viewing a Detailed Sales Report
Click the Order Report button to view a complete, Detailed Sales Report for yearbooks and other products.
![]()
The Order Detail dialog will open, displaying the report.
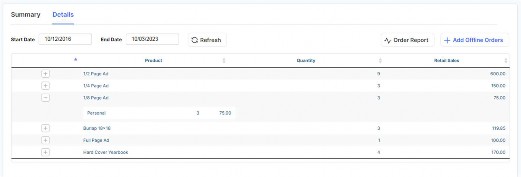
Click Text View to view a version that you can copy and paste into a spreadsheet. Click the Yearbooks tab to view yearbook sales.
Click the Products tab to view sales of all non-yearbook products.
Click Column Visibility to adjust the information available in the report. Select the items that you want to appear.
Click Print to print the report to a local printer. Click PDF to generate a PDF of the report.
Click Excel to generate an Excel spreadsheet of the report.
Entering Offline Orders
You can also enter non-E-Commerce (paper check or credit card) yearbook orders into the system, allowing you to generate a single report for both online and offline orders.
Click the Add Offline Orders button.
![]()
The Add Offline Order dialog will appear.
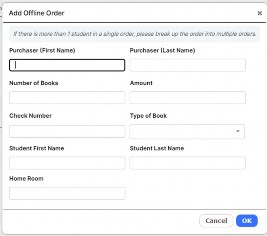
Enter the appropriate information in the text fields, and then click OK to enter the order in the system. Offline orders will appear in the Detailed Sales Report.
THE CONFIGURE PAGE
The Configure page allows an adviser to control which content is available on the site, and to view and reset page numbers.
The Configure page is only accessible by users with Adviser privileges. If you don’t see this page, you have not been provided access.
Managing Content on the Configure Page
You can use the controls on the Configure page to enable and disable Styles, Backgrounds, Fonts, and Art . This feature is available only to users with Adviser privileges.
Select the type of content you would like to manage, then click on a category to see previews of its contents. Click the checkbox next to the content that you would like to be available on the site. Then click Save. Only the selected content will be available to users of the site.
If no content is checked, then all content will be shown.
Styles are organized into categories for Elementary School, Middle School and High School. Check the box the styles you would like to display, and click Save.
Style Info is displayed to the right of the style preview and contains detailed information about the contents of the style.
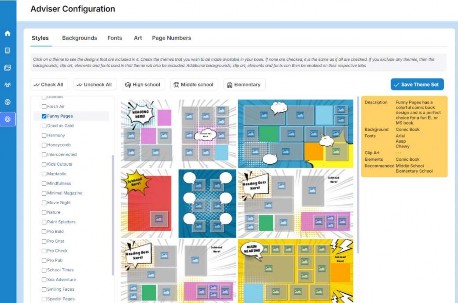
Click Page Numbers to view the current page number status and position.
Click Reset to reset all page numbers to the current settings.
Below are the available settings for adjusting page numbers. Contact your yearbook provider to change any of these variables in your book.
Placement: Top or bottom; inside, centered, or outside
Page number margin, which is the distance from the edge of the page (in inches): 0.25, 0.3125, 0.375, 0.5, 0.625, 0.75
Font: Arial, Comic Sans, Times New Roman, Trebuchet, or Verdana Font size (points): 9, 10, 11, 12
Page number style: #, -#-, or #/#
Outline: Yes or No
10 SUBMITTING YOUR YEARBOOK FOR PRINT
You will submit your final yearbook on the Yearbook page. The features for proofing and final acceptance of your yearbook are only available for users with Adviser privileges. If you don’t see these features, you do not Adviser privileges.
![]()
IMPORTANT! The specific steps required to submit and approve your book will vary based on the configuration of the software, and the specific requirements of your yearbook provider. . It is recommended that you complete this final step in conjunction with, or under the direction of, your yearbook provider or site administrator. If you have any questions about this process or the available options, please contact your yearbook provider or administrator before proceeding.
![]()
10.1 The Basic Proofing and Acceptance Process
You will typically be required to review a proof before submitting your final book for print. Your proof may be an External Proof, Press Proof (printed proof ), or Digital Proof (online PDF proof), depending on the specific requirements of your yearbook provider.
This section provides an overview of the basic proofing and acceptance process. Please see the following section, Proofing Options, for more specific detail regarding each proofing option.
The Submit Button
The Submit button appears at the top of the Yearbook Ladder page.
Once all sections have been marked as Approved, by clicking the Approve icon on the Yearbook Ladder, and show a status of Reviewed, click Submit to begin the proofing, approval and printing process.
![]()
The Approve and Reject Buttons
Once you‘ve submitted your book for a proof, all features in the software will be locked to prevent further editing of the book. You will see Accept Proof and Reject Proof buttons at the top of the page.
After reviewing your proof, click Reject Proof if you need to make any corrections. The software will be unlocked, and you can click the Reject icon on the Yearbook Ladder to unlock any section, then click the Edit icon to make additional changes.
Once you’ve made the necessary corrections, click the Mark Complete icon, and then the Approve icon, to approve the section once again. Once all sections are approved, you can click Submit Proof to request another proof for review.
When you are satisfied that the proof is exactly as you’d like, click Accept Proof to accept your final proof of the book and proceed with the printing process.
Final Acceptance
Upon clicking Accept Proof, you will be asked to review the Proof Acceptance dialog, and accept the terms.
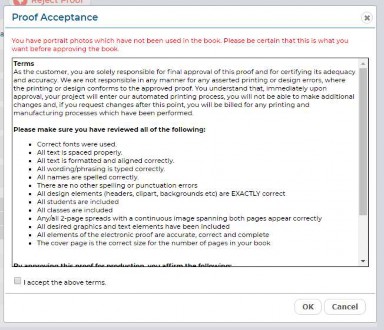
Please review all of the terms carefully, then check the checkbox when you are ready to accept the terms and submit your final book.
![]()
IMPORTANT! You will see a red error message if you have any potential problems with your book, such as portraits that have not been included. Please review any error messages carefully, and make all of the necessary corrections before proceeding.
![]()
Once you’ve accepted the proof, a final PDF will be delivered to your yearbook provider, and the book will be locked to prevent further editing.
![]()
Tip! The software will automatically generate a high-resolution PDF file and deliver it for production. An email notification will be sent at the time the order is submitted, and another email will be sent once the PDF has been transmitted. Note that it may take up to 2-3 hours to render and then transmit the PDF file to your yearbook provider.
![]()
Quantities for both the proof and final print should have also already been configured by your yearbook provider, in the Administration Pages.
Proofing Options
There are three options for proofing and approval of your yearbook that can be configured in the Administration pages by your yearbook provider: External Proofing, Press Proof, and Digital Proof. Each of these options is described in more detail below.
Please contact your yearbook provider or administrator if you have any questions about which process you will be using.
Option 1: External Proofing
The External Proofing option allows submission of proofs and assumes that the proof review and final approval will be accomplished using a process external to the software.
If the software has been configured for External Proofing, once all sections have been marked as Approved, by clicking the Approve icon on the Yearbook Ladder, and show a status of Complete, a Submit button will appear at the top of the Yearbook page.
Click Submit to begin the proofing, approval and printing process.
![]()
The software will deliver a PDF to your yearbook provider, and the software will be locked to prevent further editing.
If needed, your yearbook provider can log into the Administration pages, and Reject the proof to unlock the software for further changes, or Accept the proof as the final approved yearbook.
Please communicate directly with your yearbook provider regarding the receipt of the proof, and the details of the proofing and final acceptance process.
Option 2: Press Proofing
The Press Proof option provides the ability for the software to track and manage printed proofs and their acceptance or rejection. This option should be used when your yearbook provider will be delivering you a printed press proof for review and approval.
If the software has been configured for Press Proof, once all sections have been marked as Approved, by clicking the Approve icon on the Yearbook Ladder, and show a status of Complete, a Submit button will appear at the top of the Yearbook page.
Click Submit to begin the proofing, approval and printing process.
![]()
The software will deliver a PDF to your yearbook provider, who will then provide a printed proof of the yearbook. Please communicate with your yearbook provider regarding the details of the press proof delivery.
Once you‘ve submitted your book for a proof, all features in the software will be locked to prevent further editing of the book. You will see Accept Proof and Reject Proof buttons at the top of the page.
After reviewing your proof, click Reject Proof if you need to make any corrections. The software will be unlocked, and you can click the Reject icon on the Yearbook Ladder to unlock any section, then click the Edit icon to make additional changes.
Once you’ve made the necessary corrections, click the Mark Complete icon, and then the Approve icon, to approve the section once again. Once all sections are approved, you can click Submit Proof to request another proof for review.
When you are satisfied that the proof is exactly as you’d like, click Accept Proof to accept your final proof of the book and proceed with the printing process.
You may also see an Accept and Print button. Click Accept and Print if you would like to submit your book and proceed with the printing process, without requesting an additional proof.
Accepting Your Press Proof as Final
When you are satisfied that the proof is exactly as you’d like, click Accept Proof or Accept and Print to proceed with the printing process. The Proof Acceptance dialog will appear.
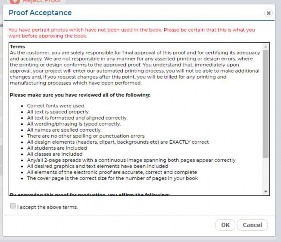
Please review all of the terms carefully, then check the checkbox when you are ready to accept the terms and submit your final book.
![]()
IMPORTANT! You will see a red error message if you have any potential problems with your book, such as portraits that have not been included. Please review any error messages carefully, and make all of the necessary corrections before proceeding.
![]()
Once you’ve accepted the proof, a final PDF will be delivered to your yearbook provider, and the book will be locked to prevent further editing.
![]()
Tip! The software will automatically generate a high-resolution PDF file and deliver it for production. An email notification will be sent at the time the order is submitted, and another when the PDF has been transmitted. Note that it may take up to 2-3 hours to render and then transmit the PDF file to your yearbook provider.
![]()
Option 3: Digital Proofing
The Digital Proof option provides an online PDF proof, and allows for online approval of the proof and final order.
If the software has been configured for Digital Proof, once all sections have been marked as Approved, by clicking the Approve icon on the Yearbook Ladder, and show a status of Complete, a Submit button will appear at the top of the Yearbook page.
Click Submit to begin the proofing, approval and printing process.
![]()
The Proof Acceptance dialog will appear, and the software will require review and approval of an online PDF proof of the entire book. Click Next to generate the PDF.
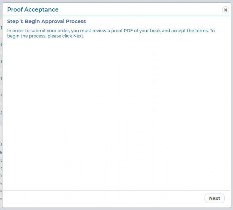
The software will generate an online PDF. A progress bar will be displayed during this process.
Once the PDF is available, click the link to display it on your screen. The Online PDF is intended for proofing only, and is not the final production PDF. It is thus lower resolution, and contains a PROOF watermark.
Once you have reviewed the entire PDF, click Next to proceed to the final step. The Proof Acceptance dialog will appear.
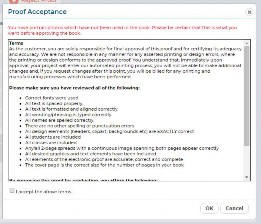
Please review all of the terms carefully, then check the checkbox when you are ready to accept the terms and submit your final book.
![]()
IMPORTANT! You will see a red error message if you have any potential problems with your book, such as portraits that have not been included. Please review any error messages carefully, and make all of the necessary corrections before proceeding.
![]()
If the PDF is not acceptable, has errors, omissions, or other issues, click Cancel. The software will be unlocked, and you can click the Reject icon on the Yearbook Ladder to unlock any section, then click the Edit icon to make additional changes.
Once you’ve made the necessary corrections, click the Mark Complete icon, and then the Approve icon, to approve the section once again. Once all sections are approved, you can click Submit Proof to request another Digital Proof for review.
Once you’ve accepted the proof, a final PDF will be delivered to your yearbook provider, and the book will be locked to prevent further editing.
Proofing Status and Messaging
The Proofing History box at the bottom of the Yearbook page will display a complete history of the proofing process.

CUSTOMER SUPPORT
Thank you for using Yearbook Pro online yearbook software! We hope it’s made the process of creating your yearbook fun and easy, and resulted in a product that everyone in your school will cherish for years to come!
Your Support Contact
UBuildABook does not support schools directly. If you have any questions that aren’t addressed in this User Guide, or in Pixami’s Knowledge Base, please contact your yearbook provider or administrator.
If you don’t know who to contact, please check the Support box at the base of the Activity page.
Knowledge Base
You can find this User Guide, Content Guides, Tutorial Videos, and a lot more in UBuildABook's Knowledge Base at http://support.pixami.com
Troubleshooting
Since the software is 100% web-based, any issues that you experience could likely be caused by a slow or intermittent Internet connection. If you experience any issues, please try the following before contacting support:
Reset your modem or restart your Internet connection.
Restart your browser.
Clear your browser cache.
Clearing Your Browser Cache
The browser cache is a temporary storage location on your computer for files downloaded by your browser to display websites. Your browser will display these ‘cached’ pages to make the page load faster. Sometimes the software requires a new updated page to be displayed, but the browser will continue to display the cached page. This is a common support issue, which can be very easily resolved by clearing your browser cache.
How to Clear Your Cache in Google Chrome
In the top-right corner of Chrome, click the Chrome menu .
Select “More tools” > “Clear browsing data”.
In the dialog that appears, select the checkbox next to Cached images and files. Note that you do not have to delete Cookies or History.
Use the menu at the top to select the amount of data that you want to delete. Select “the beginning of time” to delete everything.
Click “Clear browsing data”.
Restart your browser and then try again.
How to Clear Your Cache in Mozilla Firefox
Click the menu button and choose “Preferences”.
Select the “Advanced” panel.
Click on the “Network” tab.
In the Cached Web Content section, click “Clear Now”.
Close the “about:preferences” page. Any changes you’ve made will automatically be saved.
Restart your browser and then try again.
How to Clear Your Cache in Microsoft Edge
Click the three dots on the top right corner of the browser.
Select “Settings” from the pull-down menu.
Select “What to clear”.
Select Cached data and files. Note that you do not have to delete Cookies or History.
Click “Clear”.
Restart your browser and then try again.
How to Clear Your Cache in Apple Safari
In the Safari menu bar, click the “Safari” option.
Select the “Preferences” link.
In the Preferences window, click the “Advanced” tab.
At the bottom of the window, select the “Show Develop menu in menu bar” checkbox.
Return to the Safari menu bar and click the “Develop” option.
Select the Empty Caches link.
Restart your browser and then try again.
Diagnostics
If you scroll down on the Activity page, you will see the text Click here to display diagnostics for technical support. Clicking this link will bring you to a page with basic system performance diagnostics. This information will aid technical support in troubleshooting any problems that you may have, and you may be asked to display and communicate the contents of this page by support staff.